\(\newcommand{\footnotename}{footnote}\)
\(\def \LWRfootnote {1}\)
\(\newcommand {\footnote }[2][\LWRfootnote ]{{}^{\mathrm {#1}}}\)
\(\newcommand {\footnotemark }[1][\LWRfootnote ]{{}^{\mathrm {#1}}}\)
\(\let \LWRorighspace \hspace \)
\(\renewcommand {\hspace }{\ifstar \LWRorighspace \LWRorighspace }\)
\(\newcommand {\TextOrMath }[2]{#2}\)
\(\newcommand {\mathnormal }[1]{{#1}}\)
\(\newcommand \ensuremath [1]{#1}\)
\(\newcommand {\LWRframebox }[2][]{\fbox {#2}} \newcommand {\framebox }[1][]{\LWRframebox } \)
\(\newcommand {\setlength }[2]{}\)
\(\newcommand {\addtolength }[2]{}\)
\(\newcommand {\setcounter }[2]{}\)
\(\newcommand {\addtocounter }[2]{}\)
\(\newcommand {\arabic }[1]{}\)
\(\newcommand {\number }[1]{}\)
\(\newcommand {\noalign }[1]{\text {#1}\notag \\}\)
\(\newcommand {\cline }[1]{}\)
\(\newcommand {\directlua }[1]{\text {(directlua)}}\)
\(\newcommand {\luatexdirectlua }[1]{\text {(directlua)}}\)
\(\newcommand {\protect }{}\)
\(\def \LWRabsorbnumber #1 {}\)
\(\def \LWRabsorbquotenumber "#1 {}\)
\(\newcommand {\LWRabsorboption }[1][]{}\)
\(\newcommand {\LWRabsorbtwooptions }[1][]{\LWRabsorboption }\)
\(\def \mathchar {\ifnextchar "\LWRabsorbquotenumber \LWRabsorbnumber }\)
\(\def \mathcode #1={\mathchar }\)
\(\let \delcode \mathcode \)
\(\let \delimiter \mathchar \)
\(\def \oe {\unicode {x0153}}\)
\(\def \OE {\unicode {x0152}}\)
\(\def \ae {\unicode {x00E6}}\)
\(\def \AE {\unicode {x00C6}}\)
\(\def \aa {\unicode {x00E5}}\)
\(\def \AA {\unicode {x00C5}}\)
\(\def \o {\unicode {x00F8}}\)
\(\def \O {\unicode {x00D8}}\)
\(\def \l {\unicode {x0142}}\)
\(\def \L {\unicode {x0141}}\)
\(\def \ss {\unicode {x00DF}}\)
\(\def \SS {\unicode {x1E9E}}\)
\(\def \dag {\unicode {x2020}}\)
\(\def \ddag {\unicode {x2021}}\)
\(\def \P {\unicode {x00B6}}\)
\(\def \copyright {\unicode {x00A9}}\)
\(\def \pounds {\unicode {x00A3}}\)
\(\let \LWRref \ref \)
\(\renewcommand {\ref }{\ifstar \LWRref \LWRref }\)
\( \newcommand {\multicolumn }[3]{#3}\)
\(\require {textcomp}\)
\(\newcommand {\meta }[1]{\langle \textit {#1}\rangle }\)
\(\newcommand {\intertext }[1]{\text {#1}\notag \\}\)
\(\let \Hat \hat \)
\(\let \Check \check \)
\(\let \Tilde \tilde \)
\(\let \Acute \acute \)
\(\let \Grave \grave \)
\(\let \Dot \dot \)
\(\let \Ddot \ddot \)
\(\let \Breve \breve \)
\(\let \Bar \bar \)
\(\let \Vec \vec \)
\(\require {mathtools}\)
\(\newcommand {\vcentcolon }{\mathrel {\unicode {x2236}}}\)
\(\newcommand {\approxcolon }{\approx \vcentcolon }\)
\(\newcommand {\Approxcolon }{\approx \dblcolon }\)
\(\newcommand {\simcolon }{\sim \vcentcolon }\)
\(\newcommand {\Simcolon }{\sim \dblcolon }\)
\(\newcommand {\dashcolon }{\mathrel {-}\vcentcolon }\)
\(\newcommand {\Dashcolon }{\mathrel {-}\dblcolon }\)
\(\newcommand {\colondash }{\vcentcolon \mathrel {-}}\)
\(\newcommand {\Colondash }{\dblcolon \mathrel {-}}\)
\(\newenvironment {crampedsubarray}[1]{}{}\)
\(\newcommand {\smashoperator }[2][]{#2\limits }\)
\(\newcommand {\SwapAboveDisplaySkip }{}\)
\(\newcommand {\LaTeXunderbrace }[1]{\underbrace {#1}}\)
\(\newcommand {\LaTeXoverbrace }[1]{\overbrace {#1}}\)
\(\Newextarrow \xLongleftarrow {10,10}{0x21D0}\)
\(\Newextarrow \xLongrightarrow {10,10}{0x21D2}\)
\(\let \xlongleftarrow \xleftarrow \)
\(\let \xlongrightarrow \xrightarrow \)
\(\newcommand {\LWRmultlined }[1][]{\begin {multline*}}\)
\(\newenvironment {multlined}[1][]{\LWRmultlined }{\end {multline*}}\)
\(\let \LWRorigshoveleft \shoveleft \)
\(\renewcommand {\shoveleft }[1][]{\LWRorigshoveleft }\)
\(\let \LWRorigshoveright \shoveright \)
\(\renewcommand {\shoveright }[1][]{\LWRorigshoveright }\)
\(\newcommand {\shortintertext }[1]{\text {#1}\notag \\}\)
\(\require {centernot}\)
\(\newcommand {\LWRoverlaysymbols }[2]{\mathord {\smash {\mathop {#2\strut }\limits ^{\smash {\lower 3ex{#1}}}}\strut }}\)
\(\newcommand {\mmapsto }{\mathrel {\unicode {x021A6}}}\)
\(\let \mmapstochar \mmapsto \)
\(\newcommand {\longmmapsto }{\mathrel {\unicode {x021A6}}}\)
\(\newcommand {\mmappedfrom }{\mathrel {\unicode {x021A4}}}\)
\(\let \mmappedfromchar \mmappedfrom \)
\(\newcommand {\longmmappedfrom }{\mathrel {\unicode {x021A4}}}\)
\(\let \mmapsfrom \mmappedfrom \)
\(\let \longmmapsfrom \longmmappedfrom \)
\(\newcommand {\Mmapsto }{\mathrel {\unicode {x02907}}}\)
\(\let \Mmapstochar \Mmapsto \)
\(\newcommand {\Longmmapsto }{\mathrel {\unicode {x027FE}}}\)
\(\newcommand {\Mmappedfrom }{\mathrel {\unicode {x02906}}}\)
\(\let \Mmappedfromchar \Mmappedfrom \)
\(\newcommand {\Longmmappedfrom }{\mathrel {\unicode {x027FD}}}\)
\(\let \Mmapsfrom \Mmappedfrom \)
\(\let \Longmmapsfrom \Longmmappedfrom \)
\(\newcommand {\boxright }{\mathrel {\unicode {x025A1}\!\unicode {x02192}}}\)
\(\newcommand {\boxleft }{\mathrel {\unicode {x02190}\!\unicode {x025A1}}}\)
\(\newcommand {\boxdotright }{\mathrel {\unicode {x022A1}\!\unicode {x02192}}}\)
\(\newcommand {\boxdotleft }{\mathrel {\unicode {x02190}\!\unicode {x022A1}}}\)
\(\newcommand {\Diamondright }{\mathrel {\unicode {x025C7}\!\unicode {x02192}}}\)
\(\newcommand {\Diamondleft }{\mathrel {\unicode {x02190}\!\unicode {x025C7}}}\)
\(\newcommand {\Diamonddotright }{\mathrel {\unicode {x027D0}\!\unicode {x02192}}}\)
\(\newcommand {\Diamonddotleft }{\mathrel {\unicode {x02190}\!\unicode {x027D0}}}\)
\(\newcommand {\boxRight }{\mathrel {\unicode {x025A1}\!\unicode {x021D2}}}\)
\(\newcommand {\boxLeft }{\mathrel {\unicode {x021D0}\!\unicode {x025A1}}}\)
\(\newcommand {\boxdotRight }{\mathrel {\unicode {x022A1}\!\unicode {x021D2}}}\)
\(\newcommand {\boxdotLeft }{\mathrel {\unicode {x021D0}\!\unicode {x022A1}}}\)
\(\newcommand {\DiamondRight }{\mathrel {\unicode {x025C7}\!\unicode {x021D2}}}\)
\(\newcommand {\DiamondLeft }{\mathrel {\unicode {x021D0}\!\unicode {x025C7}}}\)
\(\newcommand {\DiamonddotRight }{\mathrel {\unicode {x027D0}\!\unicode {x021D2}}}\)
\(\newcommand {\DiamonddotLeft }{\mathrel {\unicode {x021D0}\!\unicode {x027D0}}}\)
\(\newcommand {\Diamonddot }{\mathrel {\unicode {x027D0}}}\)
\(\newcommand {\circleright }{\mathrel {\unicode {x025CB}\!\unicode {x02192}}}\)
\(\newcommand {\circleleft }{\mathrel {\unicode {x02190}\!\unicode {x025CB}}}\)
\(\newcommand {\circledotright }{\mathrel {\unicode {x02299}\!\unicode {x02192}}}\)
\(\newcommand {\circledotleft }{\mathrel {\unicode {x02190}\!\unicode {x02299}}}\)
\(\let \circleddotright \circledotright \)
\(\let \circleddotleft \circledotleft \)
\(\newcommand {\multimapinv }{\mathrel {\unicode {x027DC}}}\)
\(\newcommand {\multimapboth }{\mathrel {\unicode {x029DF}}}\)
\(\newcommand {\multimapdot }{{\mathrel {-\!\bullet }}}\)
\(\newcommand {\multimapdotinv }{\mathrel {\bullet \!-}}\)
\(\newcommand {\multimapdotboth }{\mathrel {{\bullet \!\!-\!\!\bullet }}}\)
\(\newcommand {\multimapdotbothA }{\mathrel {\unicode {x022B6}}}\)
\(\newcommand {\multimapdotbothB }{\mathrel {\unicode {x22B7}}}\)
\(\newcommand {\multimapbothvert }{\mathrel {\overset {\unicode {x025CB}}{\underset {\unicode {x025CB}}{|}}}}\)
\(\newcommand {\multimapdotbothvert }{\mathrel {\overset {\unicode {x025CF}}{\underset {\unicode {x025CF}}{|}}}}\)
\(\newcommand {\multimapdotbothBvert }{\mathrel {\overset {\unicode {x025CF}}{\underset {\unicode {x025CB}}{|}}}}\)
\(\newcommand {\multimapdotbothAvert }{\mathrel {\overset {\unicode {x025CB}}{\underset {\unicode {x025CF}}{|}}}}\)
\(\newcommand {\bignplus }{\mathop {\LWRoverlaysymbols {\unicode {xFF0B}}{\unicode {x22C2}}}}\)
\(\let \bigcapplus \bignplus \)
\(\let \capplus \bignplus \)
\(\newcommand {\bigsqcapplus }{\mathop {\LWRoverlaysymbols {\unicode {xFF0B}}{\unicode {x2A05}}} }\)
\(\let \sqcapplus \bigsqcapplus \)
\(\newcommand {\bigsqcupplus }{\mathop {\LWRoverlaysymbols {\unicode {xFF0B}}{\unicode {x2A06}}} }\)
\(\let \sqcupplus \bigsqcupplus \)
\(\newcommand {\parallelslant }{\mathrel {\unicode {x02AFD}}}\)
\(\newcommand {\parallelbackslant }{\mathrel {\unicode {x0005C}\!\!\unicode {x0005C}}}\)
\(\newcommand {\Eqqcolon }{\mathrel {=\!\unicode {x2237}}}\)
\(\let \eqqColon \Eqqcolon \)
\(\newcommand {\dashColon }{\mathrel {-\unicode {x2237}}}\)
\(\newcommand {\Colondash }{\mathrel {\unicode {x2237}-}}\)
\(\newcommand {\colonapprox }{\mathrel {:\approx }}\)
\(\newcommand {\colonsim }{\mathrel {:\sim }}\)
\(\newcommand {\Colonapprox }{\mathrel {\unicode {x2237}\!\approx }}\)
\(\newcommand {\Colonsim }{\mathrel {\unicode {x2237}\!\sim }}\)
\(\newcommand {\strictif }{\mathrel {\unicode {x0297D}}}\)
\(\newcommand {\strictfi }{\mathrel {\unicode {x0297C}}}\)
\(\newcommand {\strictiff }{\mathrel {\unicode {x0297C}\!\!\unicode {x0297D}}}\)
\(\newcommand {\circledwedge }{\mathbin {\LWRoverlaysymbols {\unicode {x025EF}}{\unicode {x02227}}}}\)
\(\newcommand {\circledvee }{\mathbin {\LWRoverlaysymbols {\unicode {x025EF}}{\unicode {0x02228}}}}\)
\(\newcommand {\circledbar }{\mathbin {\unicode {x029B6}}}\)
\(\newcommand {\openJoin }{\mathrel {\unicode {x2AA4}}}\)
\(\newcommand {\opentimes }{\mathrel {\unicode {x2AA4}}}\)
\(\newcommand {\VvDash }{\mathrel {\unicode {x22AA}}}\)
\(\newcommand {\lambdabar }{\mathord {\LWRoverlaysymbols {\raise {.5ex}{-}}{\lambda }}}\)
\(\newcommand {\lambdaslash }{\mathord {\unicode {x019B}}}\)
\(\newcommand {\Wr }{\mathbin {\unicode {x02240}\!\unicode {x02240}}}\)
\(\newcommand {\dashleftrightarrow }{\mathrel {\unicode {x021E0}\!\unicode {x021E2}}}\)
\(\let \leftrightdasharrow \dashleftrightarrow \)
\(\newcommand {\fAlt }{f}\)
\(\newcommand {\rhoAlt }{\rho }\)
\(\newcommand {\imathscr }{\mathord {\mathscr {i}}}\)
\(\newcommand {\jmathscr }{\mathord {\mathscr {j}}}\)
\(\let \llbracket \lBrack \)
\(\let \rrbracket \rBrack \)
\(\let \smlbrace \{\)
\(\let \smrbrace \}\)
\(\newcommand {\Perp }{\mathrel {\unicode {x02AEB}}}\)
\(\newcommand {\nPerp }{\mathrel {\not {\!\unicode {x02AEB}}}}\)
\(\newcommand {\Zbar }{\mathord {\unicode {x01B5}}}\)
\(\newcommand {\Angstrom }{\mathord {\unicode {x212B}}}\)
\(\newcommand {\Euler }{\mathord {\unicode {x2107}}}\)
\(\newcommand {\transp }{\mathord {\unicode {xFF34}}}\)
\(\newcommand {\hermtransp }{\mathord {\unicode {xFF28}}}\)
\(\let \htransp =\hermtransp \)
\(\newcommand {\circledplus }{\mathbin {\unicode {x2295}}}\)
\(\newcommand {\circledminus }{\mathbin {\unicode {x2296}}}\)
\(\newcommand {\circledtimes }{\mathbin {\unicode {x2297}}}\)
\(\newcommand {\circledslash }{\mathbin {\unicode {x2298}}}\)
\(\newcommand {\circleddot }{\mathbin {\unicode {x2299}}}\)
\(\let \overgroup \overparen \)
\(\let \overgroupra \overrightarrow \)
\(\let \undergroup \underparen \)
\(\let \undergroupla \underleftarrow \)
\(\newcommand {\widering }[1]{\stackrel {\unicode {x2218}}{\overgroup {#1}}}\)
\(\let \widearc \overparen \)
\(\let \wideOarc \overrightarrow \)
\(\newcommand {\LWRvvstar }[2]{{\overrightarrow {#1}_{#2}}}\)
\(\newcommand {\vv }{\ifstar \LWRvvstar \overrightarrow }\)
\(\let \smallintsl \smallint \)
\(\newcommand {\smalliintsl }{\mathop {\unicode {x222C}}\limits }\)
\(\newcommand {\smalliiintsl }{\mathop {\unicode {x222D}}\limits }\)
\(\newcommand {\smalliiiintsl }{\mathop {\unicode {x2A0C}}\limits }\)
\(\newcommand {\smallointsl }{\mathop {\unicode {x222E}}\limits }\)
\(\newcommand {\smalloiintsl }{\mathop {\unicode {x222F}}\limits }\)
\(\newcommand {\smalloiiintsl }{\mathop {\unicode {x2230}}\limits }\)
\(\newcommand {\smallvarointclockwisesl }{\mathop {\unicode {x2232}}\limits }\)
\(\newcommand {\smallointctrclockwisesl }{\mathop {\unicode {x2233}}\limits }\)
\(\newcommand {\smallsumintsl }{\mathop {\unicode {x2A0B}}\limits }\)
\(\newcommand {\smallfintsl }{\mathop {\unicode {x2A0F}}\limits }\)
\(\newcommand {\smallsqintsl }{\mathop {\unicode {x2A16}}\limits }\)
\(\let \smallintup \smallint \)
\(\newcommand {\smalliintup }{\mathop {\unicode {x222C}}\limits }\)
\(\newcommand {\smalliiintup }{\mathop {\unicode {x222D}}\limits }\)
\(\newcommand {\smalliiiintup }{\mathop {\unicode {x2A0C}}\limits }\)
\(\newcommand {\smallointup }{\mathop {\unicode {x222E}}\limits }\)
\(\newcommand {\smalloiintup }{\mathop {\unicode {x222F}}\limits }\)
\(\newcommand {\smalloiiintup }{\mathop {\unicode {x2230}}\limits }\)
\(\newcommand {\smallvarointclockwiseup }{\mathop {\unicode {x2232}}\limits }\)
\(\newcommand {\smallointctrclockwiseup }{\mathop {\unicode {x2233}}\limits }\)
\(\newcommand {\smallsumintup }{\mathop {\unicode {x2A0B}}\limits }\)
\(\newcommand {\smallfintup }{\mathop {\unicode {x2A0F}}\limits }\)
\(\newcommand {\smallsqintup }{\mathop {\unicode {x2A16}}\limits }\)
\(\newcommand {\iint }{\mathop {\unicode {x222C}}\limits }\)
\(\newcommand {\iiint }{\mathop {\unicode {x222D}}\limits }\)
\(\newcommand {\iiiint }{\mathop {\unicode {x2A0C}}\limits }\)
\(\newcommand {\oiint }{\mathop {\unicode {x222F}}\limits }\)
\(\newcommand {\oiiint }{\mathop {\unicode {x2230}}\limits }\)
\(\newcommand {\varointclockwise }{\mathop {\unicode {x2232}}\limits }\)
\(\newcommand {\ointctrclockwise }{\mathop {\unicode {x2233}}\limits }\)
\(\newcommand {\sumint }{\mathop {\unicode {x2A0B}}\limits }\)
\(\newcommand {\fint }{\mathop {\unicode {x2A0F}}\limits }\)
\(\newcommand {\sqint }{\mathop {\unicode {x2A16}}\limits }\)
\(\let \intsl \int \)
\(\newcommand {\iintsl }{\mathop {\unicode {x222C}}\limits }\)
\(\newcommand {\iiintsl }{\mathop {\unicode {x222D}}\limits }\)
\(\newcommand {\iiiintsl }{\mathop {\unicode {x2A0C}}\limits }\)
\(\let \ointsl \oint \)
\(\newcommand {\oiintsl }{\mathop {\unicode {x222F}}\limits }\)
\(\newcommand {\oiiintsl }{\mathop {\unicode {x2230}}\limits }\)
\(\newcommand {\varointclockwisesl }{\mathop {\unicode {x2232}}\limits }\)
\(\newcommand {\ointctrclockwisesl }{\mathop {\unicode {x2233}}\limits }\)
\(\newcommand {\sumintsl }{\mathop {\unicode {x2A0B}}\limits }\)
\(\newcommand {\fintsl }{\mathop {\unicode {x2A0F}}\limits }\)
\(\newcommand {\sqintsl }{\mathop {\unicode {x2A16}}\limits }\)
\(\let \intup \int \)
\(\newcommand {\iintup }{\mathop {\unicode {x222C}}\limits }\)
\(\newcommand {\iiintup }{\mathop {\unicode {x222D}}\limits }\)
\(\newcommand {\iiiintup }{\mathop {\unicode {x2A0C}}\limits }\)
\(\let \ointup \oint \)
\(\newcommand {\oiintup }{\mathop {\unicode {x222F}}\limits }\)
\(\newcommand {\oiiintup }{\mathop {\unicode {x2230}}\limits }\)
\(\newcommand {\varointclockwiseup }{\mathop {\unicode {x2232}}\limits }\)
\(\newcommand {\ointctrclockwiseup }{\mathop {\unicode {x2233}}\limits }\)
\(\newcommand {\sumintup }{\mathop {\unicode {x2A0B}}\limits }\)
\(\newcommand {\fintup }{\mathop {\unicode {x2A0F}}\limits }\)
\(\newcommand {\sqintup }{\mathop {\unicode {x2A16}}\limits }\)
\(\newcommand {\bigcupdot }{\mathop {\unicode {x2A03}}}\)
\(\newcommand {\bigcupplus }{\mathop {\unicode {x2A04}}}\)
\(\newcommand {\bigsqcap }{\mathop {\unicode {x2A05}}}\)
\(\newcommand {\bigtimes }{\mathop {\unicode {x2A09}}}\)
\(\let \varprod \bigtimes \)
\(\newcommand {\mappedfrom }{\mathrel {\unicode {x021A4}}}\)
\(\let \mappedfromchar \mappedfrom \)
\(\newcommand {\mapsfrom }{\mathrel {\unicode {x021A4}}}\)
\(\newcommand {\longmappedfrom }{\mathrel {\unicode {x027FB}}}\)
\(\newcommand {\Mapsto }{\mathrel {\unicode {x02907}}}\)
\(\let \Mapstochar \Mapsto \)
\(\newcommand {\Longmapsto }{\mathrel {\unicode {x027FE}}}\)
\(\newcommand {\Mappedfrom }{\mathrel {\unicode {x02906}}}\)
\(\let \Mappedfromchar \Mappedfrom \)
\(\newcommand {\Mapsfrom }{\mathrel {\unicode {x02906}}}\)
\(\newcommand {\Longmappedfrom }{\mathrel {\unicode {x27FD}}}\)
\(\newcommand {\medcirc }{\mathbin {\unicode {x025CB}}}\)
\(\newcommand {\medbullet }{\mathbin {\unicode {x025CF}}}\)
\(\newcommand {\varparallel }{\mathrel {\unicode {x02AFD}}}\)
\(\newcommand {\varparallelinv }{\mathrel {\unicode {x244A}}}\)
\(\newcommand {\nvarparallel }{\mathrel {\LWRoverlaysymbols {-}{\unicode {x02AFD}}}}\)
\(\newcommand {\nvarparallelinv }{\mathrel {\LWRoverlaysymbols {-}{\unicode {x244A}}}}\)
\(\newcommand {\coloneq }{\mathrel {\unicode {x02254}}}\)
\(\newcommand {\eqcolon }{\mathrel {\unicode {x02255}}}\)
\(\newcommand {\VDash }{\mathrel {\unicode {x22AB}}}\)
\(\newcommand {\preceqq }{\mathrel {\unicode {x02AB3}}}\)
\(\newcommand {\succeqq }{\mathrel {\unicode {x02AB4}}}\)
\(\newcommand {\nprecsim }{\mathrel {\LWRoverlaysymbols {/}{\unicode {x0227E}}}}\)
\(\newcommand {\nsuccsim }{\mathrel {\LWRoverlaysymbols {/}{\unicode {x0227F}}}}\)
\(\newcommand {\nlesssim }{\mathrel {\unicode {x02274}}}\)
\(\newcommand {\ngtrsim }{\mathrel {\unicode {x02275}}}\)
\(\newcommand {\nsubset }{\mathrel {\unicode {x02284}}}\)
\(\newcommand {\nsupset }{\mathrel {\unicode {x02285}}}\)
\(\newcommand {\notni }{\mathrel {\unicode {x220C}}}\)
\(\let \notowns \notni \)
\(\newcommand {\nlessapprox }{\mathrel {\LWRoverlaysymbols {/}{\unicode {x02A85}}}}\)
\(\newcommand {\ngtrapprox }{\mathrel {\LWRoverlaysymbols {/}{\unicode {x02A86}}}}\)
\(\newcommand {\npreccurlyeq }{\mathrel {\LWRoverlaysymbols {/}{\unicode {x0227C}}}}\)
\(\newcommand {\nsucccurlyeq }{\mathrel {\LWRoverlaysymbols {/}{\unicode {x0227D}}}}\)
\(\newcommand {\ngtrless }{\mathrel {\unicode {x02279}}}\)
\(\newcommand {\nlessgtr }{\mathrel {\unicode {x2278}}}\)
\(\newcommand {\nbumpeq }{\mathrel {\LWRoverlaysymbols {/}{\unicode {x0224F}}}}\)
\(\newcommand {\nBumpeq }{\mathrel {\LWRoverlaysymbols {/}{\unicode {x0224E}}}}\)
\(\newcommand {\nbacksim }{\mathrel {\LWRoverlaysymbols {/}{\unicode {x0223D}}}}\)
\(\newcommand {\nbacksimeq }{\mathrel {\LWRoverlaysymbols {/}{\unicode {x022CD}}}}\)
\(\newcommand {\nasymp }{\mathrel {\unicode {x226D}}}\)
\(\newcommand {\nequiv }{\mathrel {\unicode {x2262}}}\)
\(\newcommand {\napprox }{\mathrel {\unicode {x2249}}}\)
\(\newcommand {\nll }{\mathrel {\LWRoverlaysymbols {/}{\unicode {x0226A}}}}\)
\(\newcommand {\ngg }{\mathrel {\LWRoverlaysymbols {/}{\unicode {x0226B}}}}\)
\(\newcommand {\nthickapprox }{\mathrel {\LWRoverlaysymbols {/}{{\mathbf {\unicode {x02248}}}}}}\)
\(\newcommand {\napproxeq }{\mathrel {\LWRoverlaysymbols {/}{\unicode {x0224A}}}}\)
\(\newcommand {\nprecapprox }{\mathrel {\LWRoverlaysymbols {/}{\unicode {x02AB7}}}}\)
\(\newcommand {\nsuccapprox }{\mathrel {\LWRoverlaysymbols {/}{\unicode {x02AB8}}}}\)
\(\newcommand {\npreceqq }{\mathrel {\LWRoverlaysymbols {/}{\unicode {x02AB3}}}}\)
\(\newcommand {\nsucceqq }{\mathrel {\LWRoverlaysymbols {/}{\unicode {x02AB4}}}}\)
\(\newcommand {\nsimeq }{\mathrel {\unicode {x02244}}}\)
\(\newcommand {\nSubset }{\mathrel {\LWRoverlaysymbols {/}{\unicode {x022D0}}}}\)
\(\newcommand {\nSupset }{\mathrel {\LWRoverlaysymbols {/}{\unicode {x022D1}}}}\)
\(\newcommand {\nsqsubseteq }{\mathrel {\unicode {x022E2}}}\)
\(\newcommand {\nsqsupseteq }{\mathrel {\unicode {x022E3}}}\)
\(\newcommand {\coloneqq }{\mathrel {\unicode {x02254}}}\)
\(\newcommand {\eqqcolon }{\mathrel {\unicode {x02255}}}\)
\(\newcommand {\Coloneqq }{\mathrel {\unicode {x02A74}}}\)
\(\newcommand {\Coloneq }{\mathrel {\unicode {x2237}-}}\)
\(\newcommand {\Eqcolon }{\mathrel {-\unicode {x2237}}}\)
\(\newcommand {\lvec }[1]{\mathord {\overset {\unicode {x02190}}{#1}}}\)
\(\newcommand {\lrvec }[1]{\mathord {\overset {\unicode {x2194}}{#1}}}\)
\(\newcommand {\harpoonacc }[1]{\mathord {\overset {\unicode {x021C0}}{#1}}}\)
\(\newcommand {\lharpoonacc }[1]{\mathord {\overset {\unicode {x021BC}}{#1}}}\)
\(\newcommand {\lrharpoonacc }[1]{\mathord {\overset {\unicode {x0294E}}{#1}}}\)
\(\newcommand {\barbar }[1]{\mathord {\overset {=}{#1}}}\)
\(\newcommand {\bartilde }[1]{\mathord {\overset {\simeq }{#1}}}\)
\(\newcommand {\barhat }[1]{\mathord {\hat {\bar {#1}}}}\)
\(\newcommand {\tildebar }[1]{\mathord {\overset {\eqsim }{#1}}}\)
\(\newcommand {\tildetilde }[1]{\mathord {\overset {\approx }{#1}}}\)
\(\newcommand {\tildehat }[1]{\mathord {\hat {\tilde {#1}}}}\)
\(\newcommand {\hatbar }[1]{\mathord {\bar {\hat {#1}}}}\)
\(\newcommand {\hattilde }[1]{\mathord {\tilde {\hat {#1}}}}\)
\(\newcommand {\hathat }[1]{\mathord {\hat {\hat {#1}}}}\)
\(\newcommand {\cdotB }{\mathord {\boldsymbol {\cdot }}}\)
\(\newcommand {\cdotBB }{\mathord {\unicode {x2022}}}\)
\(\newcommand {\circS }{\boldsymbol {\circ }}\)
\(\newcommand {\bulletSSS }{\bullet }\)
\(\newcommand {\bulletSS }{\mathord {\unicode {x025CF}}}\)
\(\newcommand {\bulletS }{\mathord {\unicode {x02B24}}}\)
\(\newcommand {\primeS }{\prime }\)
\(\newcommand {\invamp }{\mathbin {\unicode {x0214B}}}\)
\(\newcommand {\Lbag }{\mathopen {\large \unicode {x027C5}}}\)
\(\newcommand {\Rbag }{\mathclose {\large \unicode {x027C6}}}\)
\(\newcommand {\circledless }{\mathrel {\unicode {x029C0}}}\)
\(\newcommand {\circledgtr }{\mathrel {\unicode {x029C1}}}\)
\(\newcommand {\circledbslash }{\mathbin {\unicode {x029B8}}}\)
\(\newcommand {\lJoin }{\mathrel {\unicode {x22C9}}}\)
\(\newcommand {\rJoin }{\mathrel {\unicode {x22CA}}}\)
\(\newcommand {\lrJoin }{\mathrel {\unicode {x2A1D}}}\)
\(\newcommand {\lrtimes }{\mathrel {\unicode {x2A1D}}}\)
\(\newcommand {\Diamondblack }{\mathord {\unicode {x025C6}}}\)
\(\newcommand {\nplus }{\mathrel {\LWRoverlaysymbols {+}{\unicode {x02229}}}}\)
\(\newcommand {\nsqsubset }{\mathrel {\LWRoverlaysymbols {/}{\unicode {x0228F}}}}\)
\(\newcommand {\nsqsupset }{\mathrel {\LWRoverlaysymbols {/}{\unicode {x02290}}}}\)
\(\newcommand {\dasharrow }{\mathrel {\unicode {x021E2}}}\)
\(\newcommand {\leftsquigarrow }{\mathrel {\unicode {x021DC}}}\)
\(\newcommand {\ntwoheadrightarrow }{\mathrel {\unicode {x02900}}}\)
\(\newcommand {\ntwoheadleftarrow }{\mathrel {\unicode {x02B34}}}\)
\(\newcommand {\boxast }{\mathbin {\unicode {x029C6}}}\)
\(\newcommand {\boxbslash }{\mathbin {\unicode {x29C5}}}\)
\(\newcommand {\boxbar }{\mathbin {\unicode {x025EB}}}\)
\(\newcommand {\boxslash }{\mathbin {\unicode {x029C4}}}\)
\(\newcommand {\varclubsuit }{\mathord {\unicode {x02667}}}\)
\(\newcommand {\vardiamondsuit }{\mathord {\unicode {x02666}}}\)
\(\newcommand {\varheartsuit }{\mathord {\unicode {x02665}}}\)
\(\newcommand {\varspadesuit }{\mathord {\unicode {x02664}}}\)
\(\newcommand {\Nearrow }{\mathrel {\unicode {x021D7}}}\)
\(\newcommand {\Searrow }{\mathrel {\unicode {x021D8}}}\)
\(\newcommand {\Nwarrow }{\mathrel {\unicode {x021D6}}}\)
\(\newcommand {\Swarrow }{\mathrel {\unicode {x021D9}}}\)
\(\newcommand {\Top }{\mathord {\unicode {x02AEA}}}\)
\(\newcommand {\Bot }{\mathord {\unicode {x02AEB}}}\)
\(\newcommand {\leadstoext }{\mathrel {\unicode {xFF5E}}}\)
\(\newcommand {\sqcupplus }{\mathbin {\LWRoverlaysymbols {+}{\unicode {x02294}}}}\)
\(\newcommand {\sqcapplus }{\mathbin {\LWRoverlaysymbols {+}{\unicode {x02293}}}}\)
\(\newcommand {\dlb }{\mathopen {\unicode {x027E6}}}\)
\(\newcommand {\drb }{\mathopen {\unicode {x027E7}}}\)
\(\newcommand {\varg }{g}\)
\(\newcommand {\vary }{y}\)
\(\newcommand {\varv }{v}\)
\(\newcommand {\varw }{w}\)
\(\newcommand {\nexistsAlt }{\mathord {\unicode {x02204}}}\)
\(\newcommand {\existsAlt }{\mathord {\unicode {x02203}}}\)
\(\newcommand {\forallAlt }{\mathord {\unicode {x02200}}}\)
\(\newcommand {\emptysetAlt }{\mathord {\unicode {x02205}}}\)
\(\newcommand {\uppartial }{\mathord {\unicode {x02202}}}\)
\(\let \varmathbb \mathbb \)
\(\let \vmathbb \mathbb \)
\(\let \vvmathbb \mathbb \)
\(\let \smallprod \prod \)
\(\let \smallsum \sum \)
\(\let \smallcoprod \coprod \)
\(\newcommand {\openbox }{\mathord {\unicode {x25FD}}}\)
\(\let \textsquare \openbox \)
\(\let \varemptyset \emptyset \)
\(\newcommand {\mathsterling }{\mathord {\unicode {x000A3}}}\)
\(\newcommand {\mathcent }{\mathord {\unicode {x000A2}}}\)
\(\def\Alphaup{\unicode{x0391}}\)
\(\def\Betaup{\unicode{x0392}}\)
\(\def\Gammaup{\unicode{x0393}}\)
\(\def\Digammaup{\unicode{x03DC}}\)
\(\def\Deltaup{\unicode{x0394}}\)
\(\def\Epsilonup{\unicode{x0395}}\)
\(\def\Zetaup{\unicode{x0396}}\)
\(\def\Etaup{\unicode{x0397}}\)
\(\def\Thetaup{\unicode{x0398}}\)
\(\def\Varthetaup{\unicode{x03F4}}\)
\(\def\Iotaup{\unicode{x0399}}\)
\(\def\Kappaup{\unicode{x039A}}\)
\(\def\Lambdaup{\unicode{x039B}}\)
\(\def\Muup{\unicode{x039C}}\)
\(\def\Nuup{\unicode{x039D}}\)
\(\def\Xiup{\unicode{x039E}}\)
\(\def\Omicronup{\unicode{x039F}}\)
\(\def\Piup{\unicode{x03A0}}\)
\(\def\Varpiup{\unicode{x03D6}}\)
\(\def\Rhoup{\unicode{x03A1}}\)
\(\def\Sigmaup{\unicode{x03A3}}\)
\(\def\Tauup{\unicode{x03A4}}\)
\(\def\Upsilonup{\unicode{x03A5}}\)
\(\def\Phiup{\unicode{x03A6}}\)
\(\def\Chiup{\unicode{x03A7}}\)
\(\def\Psiup{\unicode{x03A8}}\)
\(\def\Omegaup{\unicode{x03A9}}\)
\(\def\upAlpha{\unicode{x0391}}\)
\(\def\upBeta{\unicode{x0392}}\)
\(\def\upGamma{\unicode{x0393}}\)
\(\def\upDigamma{\unicode{x03DC}}\)
\(\def\upDelta{\unicode{x0394}}\)
\(\def\upEpsilon{\unicode{x0395}}\)
\(\def\upZeta{\unicode{x0396}}\)
\(\def\upEta{\unicode{x0397}}\)
\(\def\upTheta{\unicode{x0398}}\)
\(\def\upVartheta{\unicode{x03F4}}\)
\(\def\upIota{\unicode{x0399}}\)
\(\def\upKappa{\unicode{x039A}}\)
\(\def\upLambda{\unicode{x039B}}\)
\(\def\upMu{\unicode{x039C}}\)
\(\def\upNu{\unicode{x039D}}\)
\(\def\upXi{\unicode{x039E}}\)
\(\def\upOmicron{\unicode{x039F}}\)
\(\def\upPi{\unicode{x03A0}}\)
\(\def\upVarpi{\unicode{x03D6}}\)
\(\def\upRho{\unicode{x03A1}}\)
\(\def\upSigma{\unicode{x03A3}}\)
\(\def\upTau{\unicode{x03A4}}\)
\(\def\upUpsilon{\unicode{x03A5}}\)
\(\def\upPhi{\unicode{x03A6}}\)
\(\def\upChi{\unicode{x03A7}}\)
\(\def\upPsi{\unicode{x03A8}}\)
\(\def\upOmega{\unicode{x03A9}}\)
\(\def\upalpha{\unicode{x03B1}}\)
\(\def\upbeta{\unicode{x03B2}}\)
\(\def\upvarbeta{\unicode{x03D0}}\)
\(\def\upgamma{\unicode{x03B3}}\)
\(\def\updigamma{\unicode{x03DD}}\)
\(\def\updelta{\unicode{x03B4}}\)
\(\def\upepsilon{\unicode{x03F5}}\)
\(\def\upvarepsilon{\unicode{x03B5}}\)
\(\def\upzeta{\unicode{x03B6}}\)
\(\def\upeta{\unicode{x03B7}}\)
\(\def\uptheta{\unicode{x03B8}}\)
\(\def\upvartheta{\unicode{x03D1}}\)
\(\def\upiota{\unicode{x03B9}}\)
\(\def\upkappa{\unicode{x03BA}}\)
\(\def\upvarkappa{\unicode{x03F0}}\)
\(\def\uplambda{\unicode{x03BB}}\)
\(\def\upmu{\unicode{x03BC}}\)
\(\def\upnu{\unicode{x03BD}}\)
\(\def\upxi{\unicode{x03BE}}\)
\(\def\upomicron{\unicode{x03BF}}\)
\(\def\uppi{\unicode{x03C0}}\)
\(\def\upvarpi{\unicode{x03D6}}\)
\(\def\uprho{\unicode{x03C1}}\)
\(\def\upvarrho{\unicode{x03F1}}\)
\(\def\upsigma{\unicode{x03C3}}\)
\(\def\upvarsigma{\unicode{x03C2}}\)
\(\def\uptau{\unicode{x03C4}}\)
\(\def\upupsilon{\unicode{x03C5}}\)
\(\def\upphi{\unicode{x03D5}}\)
\(\def\upvarphi{\unicode{x03C6}}\)
\(\def\upchi{\unicode{x03C7}}\)
\(\def\uppsi{\unicode{x03C8}}\)
\(\def\upomega{\unicode{x03C9}}\)
\(\def\alphaup{\unicode{x03B1}}\)
\(\def\betaup{\unicode{x03B2}}\)
\(\def\varbetaup{\unicode{x03D0}}\)
\(\def\gammaup{\unicode{x03B3}}\)
\(\def\digammaup{\unicode{x03DD}}\)
\(\def\deltaup{\unicode{x03B4}}\)
\(\def\epsilonup{\unicode{x03F5}}\)
\(\def\varepsilonup{\unicode{x03B5}}\)
\(\def\zetaup{\unicode{x03B6}}\)
\(\def\etaup{\unicode{x03B7}}\)
\(\def\thetaup{\unicode{x03B8}}\)
\(\def\varthetaup{\unicode{x03D1}}\)
\(\def\iotaup{\unicode{x03B9}}\)
\(\def\kappaup{\unicode{x03BA}}\)
\(\def\varkappaup{\unicode{x03F0}}\)
\(\def\lambdaup{\unicode{x03BB}}\)
\(\def\muup{\unicode{x03BC}}\)
\(\def\nuup{\unicode{x03BD}}\)
\(\def\xiup{\unicode{x03BE}}\)
\(\def\omicronup{\unicode{x03BF}}\)
\(\def\piup{\unicode{x03C0}}\)
\(\def\varpiup{\unicode{x03D6}}\)
\(\def\rhoup{\unicode{x03C1}}\)
\(\def\varrhoup{\unicode{x03F1}}\)
\(\def\sigmaup{\unicode{x03C3}}\)
\(\def\varsigmaup{\unicode{x03C2}}\)
\(\def\tauup{\unicode{x03C4}}\)
\(\def\upsilonup{\unicode{x03C5}}\)
\(\def\phiup{\unicode{x03D5}}\)
\(\def\varphiup{\unicode{x03C6}}\)
\(\def\chiup{\unicode{x03C7}}\)
\(\def\psiup{\unicode{x03C8}}\)
\(\def\omegaup{\unicode{x03C9}}\)
\(\def\Alphait{\unicode{x1D6E2}}\)
\(\def\Betait{\unicode{x1D6E3}}\)
\(\def\Gammait{\unicode{x1D6E4}}\)
\(\def\Digammait{\mathit{\unicode{x03DC}}}\)
\(\def\Deltait{\unicode{x1D6E5}}\)
\(\def\Epsilonit{\unicode{x1D6E6}}\)
\(\def\Zetait{\unicode{x1D6E7}}\)
\(\def\Etait{\unicode{x1D6E8}}\)
\(\def\Thetait{\unicode{x1D6E9}}\)
\(\def\Varthetait{\unicode{x1D6F3}}\)
\(\def\Iotait{\unicode{x1D6EA}}\)
\(\def\Kappait{\unicode{x1D6EB}}\)
\(\def\Lambdait{\unicode{x1D6EC}}\)
\(\def\Muit{\unicode{x1D6ED}}\)
\(\def\Nuit{\unicode{x1D6EE}}\)
\(\def\Xiit{\unicode{x1D6EF}}\)
\(\def\Omicronit{\unicode{x1D6F0}}\)
\(\def\Piit{\unicode{x1D6F1}}\)
\(\def\Rhoit{\unicode{x1D6F2}}\)
\(\def\Sigmait{\unicode{x1D6F4}}\)
\(\def\Tauit{\unicode{x1D6F5}}\)
\(\def\Upsilonit{\unicode{x1D6F6}}\)
\(\def\Phiit{\unicode{x1D6F7}}\)
\(\def\Chiit{\unicode{x1D6F8}}\)
\(\def\Psiit{\unicode{x1D6F9}}\)
\(\def\Omegait{\unicode{x1D6FA}}\)
\(\def\alphait{\unicode{x1D6FC}}\)
\(\def\betait{\unicode{x1D6FD}}\)
\(\def\varbetait{\unicode{x03D0}}\)
\(\def\gammait{\unicode{x1D6FE}}\)
\(\def\digammait{\mathit{\unicode{x03DD}}}\)
\(\def\deltait{\unicode{x1D6FF}}\)
\(\def\epsilonit{\unicode{x1D716}}\)
\(\def\varepsilonit{\unicode{x1D700}}\)
\(\def\zetait{\unicode{x1D701}}\)
\(\def\etait{\unicode{x1D702}}\)
\(\def\thetait{\unicode{x1D703}}\)
\(\def\varthetait{\unicode{x1D717}}\)
\(\def\iotait{\unicode{x1D704}}\)
\(\def\kappait{\unicode{x1D705}}\)
\(\def\varkappait{\unicode{x1D718}}\)
\(\def\lambdait{\unicode{x1D706}}\)
\(\def\muit{\unicode{x1D707}}\)
\(\def\nuit{\unicode{x1D708}}\)
\(\def\xiit{\unicode{x1D709}}\)
\(\def\omicronit{\unicode{x1D70A}}\)
\(\def\piit{\unicode{x1D70B}}\)
\(\def\varpiit{\unicode{x1D71B}}\)
\(\def\rhoit{\unicode{x1D70C}}\)
\(\def\varrhoit{\unicode{x1D71A}}\)
\(\def\sigmait{\unicode{x1D70E}}\)
\(\def\varsigmait{\unicode{x1D70D}}\)
\(\def\tauit{\unicode{x1D70F}}\)
\(\def\upsilonit{\unicode{x1D710}}\)
\(\def\phiit{\unicode{x1D719}}\)
\(\def\varphiit{\unicode{x1D711}}\)
\(\def\chiit{\unicode{x1D712}}\)
\(\def\psiit{\unicode{x1D713}}\)
\(\def\omegait{\unicode{x1D714}}\)
\(\def\itAlpha{\unicode{x1D6E2}}\)
\(\def\itBeta{\unicode{x1D6E3}}\)
\(\def\itGamma{\unicode{x1D6E4}}\)
\(\def\itDigamma{\mathit{\unicode{x03DC}}}\)
\(\def\itDelta{\unicode{x1D6E5}}\)
\(\def\itEpsilon{\unicode{x1D6E6}}\)
\(\def\itZeta{\unicode{x1D6E7}}\)
\(\def\itEta{\unicode{x1D6E8}}\)
\(\def\itTheta{\unicode{x1D6E9}}\)
\(\def\itVartheta{\unicode{x1D6F3}}\)
\(\def\itIota{\unicode{x1D6EA}}\)
\(\def\itKappa{\unicode{x1D6EB}}\)
\(\def\itLambda{\unicode{x1D6EC}}\)
\(\def\itMu{\unicode{x1D6ED}}\)
\(\def\itNu{\unicode{x1D6EE}}\)
\(\def\itXi{\unicode{x1D6EF}}\)
\(\def\itOmicron{\unicode{x1D6F0}}\)
\(\def\itPi{\unicode{x1D6F1}}\)
\(\def\itRho{\unicode{x1D6F2}}\)
\(\def\itSigma{\unicode{x1D6F4}}\)
\(\def\itTau{\unicode{x1D6F5}}\)
\(\def\itUpsilon{\unicode{x1D6F6}}\)
\(\def\itPhi{\unicode{x1D6F7}}\)
\(\def\itChi{\unicode{x1D6F8}}\)
\(\def\itPsi{\unicode{x1D6F9}}\)
\(\def\itOmega{\unicode{x1D6FA}}\)
\(\def\italpha{\unicode{x1D6FC}}\)
\(\def\itbeta{\unicode{x1D6FD}}\)
\(\def\itvarbeta{\unicode{x03D0}}\)
\(\def\itgamma{\unicode{x1D6FE}}\)
\(\def\itdigamma{\mathit{\unicode{x03DD}}}\)
\(\def\itdelta{\unicode{x1D6FF}}\)
\(\def\itepsilon{\unicode{x1D716}}\)
\(\def\itvarepsilon{\unicode{x1D700}}\)
\(\def\itzeta{\unicode{x1D701}}\)
\(\def\iteta{\unicode{x1D702}}\)
\(\def\ittheta{\unicode{x1D703}}\)
\(\def\itvartheta{\unicode{x1D717}}\)
\(\def\itiota{\unicode{x1D704}}\)
\(\def\itkappa{\unicode{x1D705}}\)
\(\def\itvarkappa{\unicode{x1D718}}\)
\(\def\itlambda{\unicode{x1D706}}\)
\(\def\itmu{\unicode{x1D707}}\)
\(\def\itnu{\unicode{x1D708}}\)
\(\def\itxi{\unicode{x1D709}}\)
\(\def\itomicron{\unicode{x1D70A}}\)
\(\def\itpi{\unicode{x1D70B}}\)
\(\def\itvarpi{\unicode{x1D71B}}\)
\(\def\itrho{\unicode{x1D70C}}\)
\(\def\itvarrho{\unicode{x1D71A}}\)
\(\def\itsigma{\unicode{x1D70E}}\)
\(\def\itvarsigma{\unicode{x1D70D}}\)
\(\def\ittau{\unicode{x1D70F}}\)
\(\def\itupsilon{\unicode{x1D710}}\)
\(\def\itphi{\unicode{x1D719}}\)
\(\def\itvarphi{\unicode{x1D711}}\)
\(\def\itchi{\unicode{x1D712}}\)
\(\def\itpsi{\unicode{x1D713}}\)
\(\def\itomega{\unicode{x1D714}}\)
\(\newcommand{\anglesLWRsubstar}[2][]{{#1\left \langle #2#1\right \rangle }}\)
\(\newcommand{\anglesLWRsubnostar}[2][]{{#1\langle #2#1\rangle }}\)
\(\newcommand{\angles}{\ifstar\anglesLWRsubstar\anglesLWRsubnostar}\)
2 Tutorial ¶ 2.1 Loading the Package 
After installing the package, the TikZ -Feynman package can be loaded with \usepackage{tikz-feynman} in the preamble of the TEX document. It is recommend that you also specify the version of TikZ -Feynman to use with the
optional package argument compat : \usepackage[compat=1.1.0]{tikz-feynman} . This ensures that any new versions of TikZ -Feynman do not produce any undesirable changes without warning.
2.2 A First Diagram 
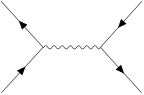
Feynman diagrams can be declared with the \feynmandiagram command. It is analogous to the \tikz command from TikZ and requires a final semi-colon (; ) to finish the environment. For example, a
simple \(s\)-channel diagram is:
Line 1
\feynmandiagram introduces the Feynman diagram and allows for optional arguments to be given in the brackets [⟨ options ⟩ ] . In this instance, horizontal=a to b orients the
algorithm outputs such that the line through vertices a and b is horizontal.
Line 2
The left fermion line is drawn by declaring three vertices (i1 , a and i2 ) and connecting them with edges -- . Just like the \feynmandiagram command above, each edge also takes optional
arguments specified in brackets [⟨ options ⟩ ] . In this instance, these edges need arrows in order to indicate that they are fermion lines, so the fermion style is added to them.
Optional arguments can also be given to the vertices in exactly the same way.
Line 3
This edge connects vertices a and b with an edge styled as a photon. Since there is already a vertex labelled a , the algorithm will connect it to a new vertex labeled b .
Line 4
This line is analogous to line 2 and introduces two new vertices, f1 and f2 . It re-uses the previously labelled b vertex.
Line 5
Finish the declaration of the Feynman diagram. The final semi-colon (; ) is important.
The name given to each vertex in the graph does not matter. So in this example, i1 , i2 denote the initial particles; f1 , f2 denotes the final particles; and a , b
are the end points of the propagator; however, any other labels could have been given. The only important aspect is that what was called a in line 2 is also a in line 3 so that the underlying algorithm treats them as the same vertex.
The order in which vertices are declared does not matter as the default algorithm re-arranges everything7
As a final remark, the calculation of where vertices should be placed is usually done through an algorithm written in Lua. As a result, Lua TEX is required in order to make use of these algorithms. If Lua TEX is not used, TikZ -Feynman will default to a more rudimentary algorithm and will warn the user instead.
2.3 Adding Styles 
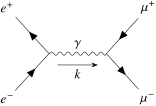
So far, the examples have only used the photon and fermion styles. The TikZ -Feynman package comes with quite a few extra styles for edges and vertices which are all documented over in section 3 . For example, it is possible to add momentum arrows with momentum= ⟨ text ⟩ , and in the case of end vertices, the particle can be labelled with particle= ⟨ text ⟩ . This is illustrated in the following example where the generic \(s\)-channel diagram from section 2.2 is annotated into a \(e^{+}e^{-} \to
\mu ^{+}\mu ^{-}\) diagram:
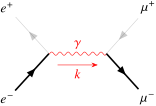
In addition to the style keys documented below, style keys from TikZ can be used as well:
copy
\feynmandiagram [horizontal a to b ] { i1 [particle \ (e^{-}\) -- [fermion very thick ] a -- [fermion opacity =0.2 ] i2 [particle \ (e^{+}\) a -- [red , photon edge label \ (\gamma\) momentum' {[arrow style red ]\ (k\) } ] b , f1 [particle \ (\mu^{+}\) -- [fermion opacity =0.2 ] b -- [fermion very thick ] f2 [particle \ (\mu^{-}\)
For a list of all the various styles that TikZ provides, have a look at the TikZ manual
TikZ -Feynman also supports combining styles together which can be useful in certain models such as supersymmetry:
2.4 When the Algorithm Isn’t Enough 
By default, the \feynmandiagram and \diagram commands use the spring layout algorithm to place all the edges8 . The spring layout algorithm attempts to ‘spread out’ the diagram as much as possible
which—for most simpler diagrams—gives a satisfactory result; however in some cases, this does not produce the best diagram and this section will look at alternatives. There are three main alternatives:
Add invisible edges
While still using the default algorithm, it is possible to force certain vertices to be closer together by adding extra edges and making them invisible through draw=none . The algorithm will treat these extra edges in the same way, but they are simply not drawn at the end;
Use a different algorithm
In some circumstances, other algorithms may be better suited. Some of the other graph layout algorithms are listed in section 3.2.2 , and an exhaustive list of all algorithms and their parameters is given in the TikZ manual
Manual placement
As a last resort, very complicated or unusual diagrams will require each vertex to be manually placed. TikZ -Feynman offers a simplified syntax for manual placement so that it is not too difficult.
2.4.1 Invisible Edges 
The underlying algorithm treats all edges in exactly the same way when calculating where to place all the vertices, and the actual drawing of the diagram (after the placements have been calculated) is done separately. Consequently, it is possible to add edges to the algorithm, but prevent them from being drawn by adding draw=none to the edge style.
This is particularly useful if you want to ensure that the initial or final states remain closer together than they would have otherwise as illustrated in the following example (note that opacity=0.2 is used instead of draw=none to illustrate where exactly the edge is located).
2.4.2 Alternative Algorithms 
The graph drawing library from TikZ has several different algorithms to position the vertices9 By default, \diagram and \feynmandiagram use the spring layout algorithm to place the vertices. The
spring layout attempts to spread everything out as much as possible which, in most cases, gives a nice diagram; however, there are certain cases where this does not work. A good example where the spring layout does not work are decays where we have the decaying particle
on the left and all the daughter particles on the right.
You may notice that in addition to adding the layered layout style to \feynmandiagram , we also changed the order in which we specify the vertices. This is because the layered layout algorithm does pay attention to the order in which vertices
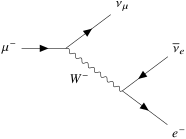
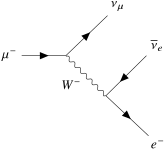
are declared (unlike the default spring layout ); as a result, c--f2, c--f3 has a different meaning to f2--c--f3 . In the former case, f2 and f3 are both on the layer below c as desired; whilst the latter case places f2 on the layer above c (that, the same layer as where the \(W^{-}\) originates).
2.4.3 Manual Placement 
In more complicated diagrams, it is quite likely that none of the algorithms work, no matter how many invisible edges are added. In such cases, the vertices have to be placed manually. TikZ -Feynman allows for vertices to be manually placed by using the \vertex command.
The \vertex command is available only within the feynman environment (which itself is only available inside a tikzpicture ). The feynman environment loads all the relevant styles from TikZ -Feynman and declares additional TikZ -Feynman-specific commands such as \vertex and \diagram . This is inspired from PGFPlots and its use of the axis environment.
The \vertex command is very much analogous to the \node command from TikZ , with the notable exception that the vertex contents are optional; that is, you need not have { ⟨ text ⟩ } at the end. In the case where {} is specified, the vertex automatically is given the particle style, and otherwise it is a usual (zero-sized) vertex.
To specify where the vertices go, it is possible to give explicit coordinates though it is easier to use the positioning library from TikZ which allows vertices to be placed relative to existing vertices10 . By using relative placements, it is possible to easily tweak one
part of the graph and everything will adjust accordingly—the alternative being to manually adjust the coordinates of every affected vertex.
Finally, once all the vertices have been specified, the \diagram* command is used to specify all the edges. This works in much the same way as \diagram (and also \feynmandiagram ), except that it uses an very basic algorithm to place new
nodes and allows existing (named) nodes to be included. In order to refer to an existing node, the node must be given in parentheses.
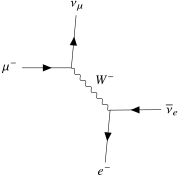
This whole process of specifying the nodes and then drawing the edges between them is shown below for the muon decay:
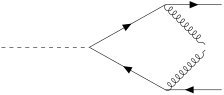
One important note is that it is not possible to arbitrarily use automatic and manual placement of vertices; automatic placement should be used first (if at all) and manually placed vertices should be specified subsequently. This is due to most algorithms not being able to handle nodes with fixed placement. The following example
illustrates how an initial automatically generated layout can be built upon by placing new nodes relative to the automatically placed ones: