chemfig
Advanced usage
12 How to …
12.1 Write a colored atom
Since the package xcolor is loaded by TikZ, itself loaded by chemfig, we can write color commands in the code of a molecule, mainly \color and \textcolor. The atoms are displayed in TikZ nodes which behaves like boxes of TeX and it is as if these atoms were put in a group. Therefore, the color change remains local to the atom.
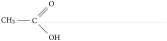
\chemfig{C\color{blue}H_3-C(=[1]O)-[7]O\color{red}H}
This code does not work, because of the rule used to separate atoms: here, the first atom starts at “C” and spreads to the next uppercase letter. Therefore, this atom is “C\color{blue}” and the color change occurs at the end of atom and has no effect. We need to force chemfig to cut the first atom just after “C” with the character “|” and then include \color{blue}H_3 between braces so that chemfig does not stop the atom 2 before the uppercase “H” which would leave the color change alone and therefore ineffective in an atom:
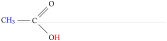
\chemfig{C|{\color{blue}H_3}-C(=[1]O)-[7]O|{\color{red}H}}
The same effect can be obtained with \textcolor:
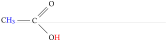
\chemfig{C|\textcolor{blue}{H_3}-C(=[1]O)-[7]O|\textcolor{red}{H}}
The main disadvantage is that we have to do the same for every atom that need to be colored, even if they are contiguous.
12.2 Add a superscript without modifying a bond
Adding a charge to an atom with a mathematical exponent implies that the box (and therefore the TikZ node) containing the atom has its dimensions modified. It has no importance when the atom is trailing but the alignment may be compromised if a bond is attached to the atom. The first reaction is to put the charge in a box with no width and therefore use the command \rlap1, which often gives good results. We see here that with \rlap, the horizontal alignment of atoms is preserved:

\chemfig{A^+-[2]B}

\qquad

\chemfig{A\rlap{${}^+$}-[2]B}
The macro \charge allows this task to be performed simply and accurately.
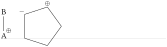
\chemfig{\charge{[extra sep=0pt]45[anchor=180+\chargeangle]=%

$\scriptstyle\oplus$}{A}-[2]B}

\qquad

\chemfig{*5(---\charge{90:2pt=$\scriptstyle\oplus$}{}-%

\charge{135:2pt=$\scriptstyle-$}{}-)}
12.3 Draw a curve bond
We have already seen that with the TikZ library “decorations.pathmorphing”, we can draw a wavy bond:

\chemfig{A-[,3,,,decorate,decoration=snake]B}


\chemfig{A-[,3,,,decorate,decoration={snake,amplitude=1.5mm,

    segment length=2.5mm}]B}
It is also possible to define a "wb" sub-molecule to draw a wavy bond perpendicular to the previous bond:
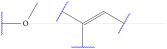
\definesubmol{wb}{%

  (-[::90,.5,,,draw=none]%

  -[::180,,,,blue,decorate,decoration={%

    snake,amplitude=0.2mm,segment length=0.75mm

    }%

  ])}

\chemfig{!{wb}-O-[:60]}

\qquad

\chemfig{([:150]-!{wb})([:-90]-!{wb})=_[:30]-[:-30]!{wb}}
For more flexibility, you can also define nodes using the character “@” and reuse these nodes after the molecule has been drawn to connect them with a curved line using \chemmove:
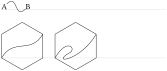
\chemfig{@{a}A-[,,,,draw=none]@{b}B}

\chemmove{\draw[-](a)..controls +(45:7mm) and +(225:7mm)..(b);}

\bigskip


\chemfig{*6(@{a}---@{b}---)}

\chemmove{\draw[-](a)..controls +(60:3em) and +(240:3em)..(b);}

\quad

\chemfig{*6(@{a}---@{b}---)}

\chemmove{\draw[-](a)..controls +(60:3em) and +(30:1em)..

    ++(20:2em) ..controls +(210:3em) and +(-120:4em) ..(b);}
12.4 Draw a polymer element
The macro \polymerdelim, until now undocumented and in the test phase, becomes officially released in chemfig with version 1.33. Its syntax is as follows:
\polymerdelim[⟨keys⟩=⟨values⟩]{⟨node1⟩}⟨node2⟩}
The effect, after possibly two compilations, is to place vertical delimiters at the specified nodes. The parameters are specified via the ⟨keys⟩ and ⟨values⟩, which are listed below, default values and actions.
| ⟨keys⟩ | default ⟨values⟩ | Action |
| delimiters | () | Defines the delimiters. If these delimiters are brackets, write delimiters={[]}. |
| height | 10pt | Defines the height (above the node) of the delimiters. |
| depth | ⟨vide⟩ | Defines the depth (below the node) of the delimiters. If the ⟨value⟩ is empty, then the depth is equal to the height. |
| h align | true | Boolean which, when ⟨false⟩, places the 2nd delimiter on the 2nd node, at the risk that the delimiters are not on the same horizontal line. |
| auto rotate | false | Boolean which, when ⟨true⟩ and h align = ⟨false⟩, automatically turns the delimiters to be perpendicular to the line that connects the two nodes. |
| rotate | 0 | When h align = ⟨false⟩ and auto rotate = ⟨false⟩, sets the rotation angle of the two delimiters. |
| open xshift | 0pt | Defines the horizontal offset of the opening delimiter. |
| close xshift | ⟨vide⟩ | Defines the horizontal offset of the closing delimiter. If the ⟨value⟩ is empty, then this offset becomes opposite to the offset of the opening delimiter. |
| indice | n | Defines the indices that will be placed at the right bottom of the closing delimiter. |
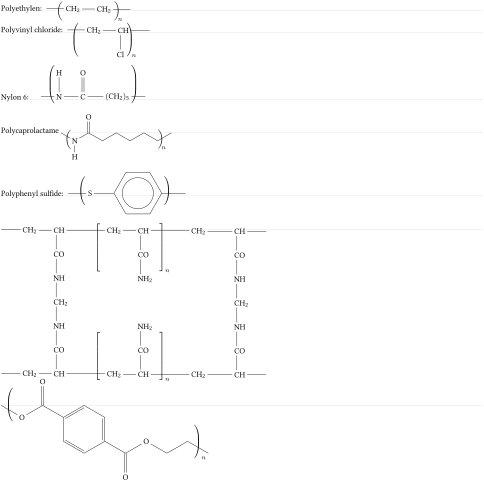
Polyethylen:

\chemfig{\vphantom{CH_2}-[@{op,.75}]CH_2-CH_2-[@{cl,0.25}]}

\polymerdelim[height = 5pt, indice = \!\!n]{op}{cl}

\bigskip


Polyvinyl chloride:

\chemfig{\vphantom{CH_2}-[@{op,1}]CH_2-CH(-[6]Cl)-[@{cl,0}]}

\polymerdelim[height = 5pt, depth = 25pt, open xshift = -10pt, indice = \!\!n]{op}{cl}

\bigskip


Nylon 6:

\chemfig{\phantom{N}-[@{op,.75}]{N}(-[2]H)-C(=[2]O)-{(}CH_2{)_5}-[@{cl,0.25}]}

\polymerdelim[height = 30pt, depth = 5pt, indice = {}]{op}{cl}

\bigskip


Polycaprolactame

\chemfig[atom sep = 2em]{[:-30]-[@{left,.75}]N(-[6]H)-[:30](=[2]O)--[:30]--[:30]--[@{right,0.25}:30]}

\polymerdelim[height = 5pt, indice = \!\!n]{left}{right}

\bigskip


Polyphenyl sulfide:

\chemfig{\vphantom{S}-[@{op,.75}]S-(**6(---(-[@{cl,0.25}])---))}

\polymerdelim[delimiters = (), height = 15pt, indice = {}]{op}{cl}

\bigskip


\chemfig{-CH_2-CH([6]-CO-NH-CH_2-NH-CO-CH([4]-CH_2-)([0]-[@{downleft,0.8},2]CH_2

-CH([2]-CO-NH_2)-[@{downright,0.3},2]CH_2-[,1.5]C?H-))-[@{upleft,0.8},2]CH_2

-CH([6]-CO-NH_2)-[@{upright,0.3},2]CH_2-[,1.5]CH([6]-CO-NH-CH_2-NH-C?O)-}

\polymerdelim[delimiters ={[]}, height = 5pt, depth = 40pt, indice = n]{upleft}{upright}

\polymerdelim[delimiters ={[]}, height = 40pt, depth = 5pt, indice = n]{downleft}{downright}


\chemfig{-[@{op,.5}:-30]O-[::60](=[::60]O)-[::-60]*6(-=-(-(=[::-60]O)-[::60]O-[::-60]-[::60]-[@{cl,.5}::-60])=-=)}

\polymerdelim[height=6ex, indice=n, h align=false]{op}{cl}
12.5 Draw the symmetrical of a molecule
The two commands \hflipnext and \vflipnext allow to draw the symmetrical of the next molecule about a horizontal or vertical axis. If we want to draw more symmetrical molecules, we need to write these commands before each molecule involved.
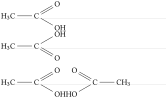
\chemfig{H_3C-C(=[:30]O)-[:-30]OH}% original


\vflipnext

\chemfig{H_3C-C(=[:30]O)-[:-30]OH}\medskip


\chemfig{H_3C-C(=[:30]O)-[:-30]OH}% original

\hflipnext

\chemfig{H_3C-C(=[:30]O)-[:-30]OH}
12.6 Add text above bonds and arc to angles
Once we have understood that the character “@” can put a “global” TikZ node, that is to say a node accessible after the molecule has been drawn, everything that TikZ can do with nodes (that is to say a lot of things) becomes possible.
To write something above or below a bond, we can put two “global” nodes on the atoms at the ends of this bond and write midway of them a text, raised or lowered so that it falls to just above or below the bond. This is done by the macro \bondname in the code below.
To draw an arc between two bonds, three atoms are involved on which we have to put three “global” nodes. The macro \arcbetweennodes calculates the angle between two lines drawn from a node. Then \arclabel draws an arc between two bonds and writes a text next to the arc: the optional argument of this macro is the TikZ code used to custom the arc. The second argument is the radius of the arc and the following three arguments are the names of global nodes between which the arc must be drawn, the middle name needs to be the vertex of the angle. The last argument is the text to write.
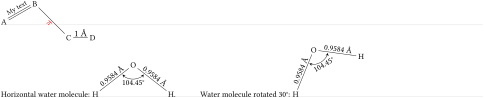
\newcommand\angstrom{\mbox{\normalfont\AA}}

\newcommand\namebond[4][5pt]{\chemmove{\path(#2)--(#3)node[midway,sloped,yshift=#1]{#4};}}


\newcommand\arcbetweennodes[3]{%

  \pgfmathanglebetweenpoints{\pgfpointanchor{#1}{center}}{\pgfpointanchor{#2}{center}}%

  \let#3\pgfmathresult}


\newcommand\arclabel[6][stealth-stealth,shorten <=1pt,shorten >=1pt]{%

  \chemmove{%

    \arcbetweennodes{#4}{#3}\anglestart \arcbetweennodes{#4}{#5}\angleend

    \draw[#1]([shift=(\anglestart:#2)]#4)arc(\anglestart:\angleend:#2);

    \pgfmathparse{(\anglestart+\angleend)/2}\let\anglestart\pgfmathresult

    \node[shift=(\anglestart:#2+1pt)#4,anchor=\anglestart+180,rotate=\anglestart+90,inner sep=0pt,

          outer sep=0pt]at(#4){#6};}}


\chemfig{@{a}A=[:30,1.5]@{b}B-[7,2]@{c}C-@{d}D}

\namebond{a}{b}{\scriptsize My text}

\namebond[-3.5pt]{b}{c}{\small\color{red}$\pi$}

\namebond{c}{d}{\small1 \angstrom}

\medskip


Horizontal water molecule: \chemfig{@{1}H-[::37.775,2]@{2}O-[::-75.55,2]@{3}H}.

\namebond{1}{2}{\footnotesize0.9584 \angstrom}

\namebond{2}{3}{\footnotesize0.9584 \angstrom}

\arclabel{0.5cm}{1}{2}{3}{\footnotesize104.45\textdegree}

\qquad

Water molecule rotated 30\textdegree: \chemfig{[:30]@1H-[::37.775,2]@2O-[::-75.55,2]@3H}

\namebond12{\footnotesize0.9584 \angstrom}

\namebond23{\footnotesize0.9584 \angstrom}

\arclabel{0.5cm}{1}{2}{3}{\footnotesize104.45\textdegree}
12.7 Dessiner des liaisons multiples
Again, the “decorations.markings” library allows to draw multiple bonds:

\catcode`_=11

\tikzset{nbond/.style args={#1}{%

  draw=none,%

  decoration={%

    markings,%

    mark=at position 0 with {\coordinate (CFstart@) at (0,0);},

    mark=at position 1 with {%

    \foreach\CF_i in{0,1,...,\number\numexpr#1-1}{%

      \pgfmathsetmacro\CF_nbondcoeff{\CF_i-0.5*(#1-1)}%

      \draw ([yshift=\CF_nbondcoeff\CF_doublesep]CFstart@)--(0,\CF_nbondcoeff\CF_doublesep);

      }%

    }

    },

  postaction={decorate}

  }

}

\catcode`\_=8

\chemfig{A-[1,,,,nbond=4]B-[:-30,,,,nbond=5]C-[6,,,,nbond=6]D}
1 If you have to put the charge at the left of the atom, you must use the command \llap.