chemfig
Advanced usage
7 Placement of Atoms
7.1 Groups of atoms
In a group of atoms, the atoms are placed one after the other in a well-established order:
the first one which is placed (which we will call "reference atom") is the one on which the bond arrives; in the case of the beginning of the molecule, the atom on the left is the reference atom;
the atoms to the right of the reference atom are then placed from left to right;
atoms to the left of the reference atom are finally placed from right to left.
In the group of atoms thus formed, the baselines of each atom are on the same horizontal line, in other words, the atoms are all aligned on the same horizontal line.
In the example below whose code would be "\chemfig{A[:-60,,,3]BCDEF}" the reference atom of the 2nd group of atoms is "D" because the bond is requested to arrive on the 3rd atom. Below each atom of this group is the sequence number in which the atom is displayed:

7.2 Vertical alignment
The baseline is used to finely control the vertical placement of the molecule in relation to the baseline of the current paragraph.
It is set to ⟨0pt⟩ by default, and in this case, the first atom encountered (whether empty or not) is the one placed on the baseline of the current paragraph, shown in gray on the examples in this manual. The choice of this first atom therefore conditions the placement of all the others, and often influences the placement of the entire molecule.
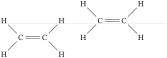
\chemfig{H-[7]C(-[5]H)=C(-[1]H)-[7]H}\qquad

\chemfig{C(-[3]H)(-[5]H)=C(-[1]H)-[7]H}
An arbitrary dimension can be specified to vertically shift the molecule by this value with the syntax baseline = ⟨dimension⟩:
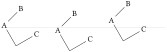
\chemfig{A(-[:-60]-[:30]C)-[:45]B}\qquad

\chemfig[baseline=5pt]{A(-[:-60]-[:30]C)-[:45]B}\qquad

\chemfig[baseline=-5pt]{A(-[:-60]-[:30]C)-[:45]B}
With the syntax baseline = ⟨(name)⟩ (the name must be in parentheses), we specify that the baseline of the molecule is at the node named ⟨name⟩. The name of the atom can be the one assigned automatically by chemfig (of the form n⟨a⟩-⟨b⟩) or a name given by the user using the syntax @{⟨name ⟩} (see section 14).
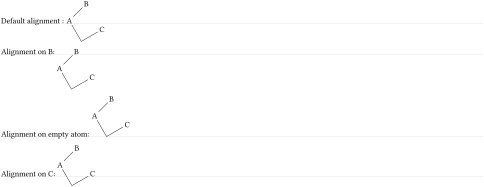
Default alignment :      \chemfig{A(-[:-60]-[:30]C)-[:45]B}\medbreak

Alignment on B:          \chemfig[baseline=(b.base)]{A(-[:-60]-[:30]C)-[:45]@{b}B}\medbreak

Alignment on empty atom: \chemfig[baseline=(vide)]{A(-[:-60]@{vide}-[:30]C)-[:45]B}\medbreak

Alignment on C:          \chemfig[baseline=(c.base)]{A(-[:-60]-[:30]@{c}C)-[:45]B}
It is possible to name TikZ nodes. Thus, if we want to vertically center several molecules on the current baseline, we set baseline to ⟨(current bounding box.center)⟩.

1) \chemfig{A-[:-45]B} et 2) \chemfig{B-[:45]C}\bigbreak


\setchemfig{baseline=(current bounding box.center)}% vertical centering of the following molecules

1) \chemfig{A-[:-45]B} et 2) \chemfig{B-[:45]C}

\setchemfig{baseline=0pt}% back to default value
7.3 Bonds between atoms
A bond starting from an atom would, if extended, pass through the centre of its bounding box. The atom placed at the end of the bond has its center of its bounding box is in the extension of the bond. Therefore, a bond between two atoms extends through the centers of their bounding boxes, as shown in this example:
=.25pt


This mechanism can create misalignments between groups of atoms that are particularly visible when the bonds are horizontal. Everything works well when the atoms have the same vertical dimensions; however, if a departure atom is high (with exponent) or deep (with subscript) and the arrival atom has a different vertical dimension, the alignment is broken.

\large\setchemfig{atom sep=2em}

\chemfig{A^1-B-C-D}\par

\chemfig{E_1-F-G-H}
This phenomenon can be highlighted by making the bounding boxes of the atoms visible, where we can clearly see that the atoms “B” and “F” have bounding boxes whose height takes into account the heights of the previous atoms:

\large\setchemfig{atom sep=2em}

\fboxsep=-0.2pt \fboxrule0.2pt

\renewcommand\printatom[1]{\fbox{\ensuremath{\mathrm#1}}}

\chemfig{A^1-B-C-D}\par

\chemfig{E_1-F-G-H}
Since the bounding box of the first atom has a different vertical extent than the next one, a vertical offset is created for the subsequent bounding boxes. This offset is clearly visible when the bonds are horizontal.
The behavior prior to version 1.7 of chemfig masked this effect on the first atom following the problematic bounding box by adding the \vphantom of the previous atom to the argument of each \printatom. You can revert to this behavior by setting the use atom strut key to ⟨true⟩.

\large\setchemfig{atom sep=2em}

\fboxsep=-0.2pt \fboxrule0.2pt

\renewcommand\printatom[1]{\fbox{\ensuremath{\mathrm#1}}}

\chemfig{A^1-B-C-D}\quad

\chemfig[use atom strut=true]{A^1-B-C-D}


\chemfig{E_1-F-G-H}\quad

\chemfig[use atom strut=true]{E_1-F-G-H}
Since no automatic solution is satisfactory, this problem can be manually circumvented by creating an end atom that is a “strut” equal to vphantom{X}: thus, the starting atom has a “normal” height and no offset will affect the following group of atoms. A sub-molecule is used here for greater conciseness.

\large\setchemfig{atom sep=2em}

\definesubmol\I{\vphantom{X}}

\chemfig{A^1|!\I-B-C-D}\par

\chemfig{E_1|!\I-F-G-H}
The disadvantage is that the first bond is too long because the departure atom now has a zero horizontal dimension.
7.4 La macro \chemskipalign
For any group of atoms it is possible to temporarily deactivate the alignment adjustment mechanism and thus neutralize the \vphantom. Simply place the \chemskipalign command in the group of atoms; the alignment will resume in the following group of atoms as if the group of atoms containing \chemskipalign had never existed. The following example shows the effects of this instruction: the reference point of the box containing the first atom is placed at the level of the bond which arrives from the left. The bounding boxes of the atoms are drawn in the second line.

\large

\chemfig{A-.-B}\quad

\chemfig{A-\chemskipalign.-B}\par\bigskip

\fboxsep=0pt

\renewcommand\printatom[1]{\fbox{\ensuremath{\mathrm{#1}}}}

\chemfig{A-.-B}\quad

\chemfig{A-\chemskipalign.-B}
This command is to be used with caution lest the alignment of atoms in the next group be disrupted. In general, all will be well if the group of atoms featuring \chemskipalign contains a single atom whose height and depth are less than those of the preceding and following atoms, and if the preceding and following atoms have identical heights and depths. Here is an example of the mess that results when the group of atoms contains two atoms, here “\chemskipalign.” and “B”:

\large

\fboxsep=0pt

\renewcommand\printatom[1]{\fbox{\ensuremath{\mathrm{#1}}}}

\chemfig{A-\chemskipalign.B-C}
This feature can sometimes be useful. Suppose we want to draw the following molecule

We can define commands which will draw the empty and full disks with TikZ. To ensure that these disks are at the right height, namely the height of the bond arriving at them, we will use the command \chemskipalign. In the second line below the bonds are “stuck” to the disks by using the ability to change the bond shortening with the “#” character, a feature seen on section 4.

\def\emptydisk{\chemskipalign\tikz\draw(0,0)circle(2pt);}

\def\fulldisk{\chemskipalign\tikz\fill(0,0)circle(2pt);}

\chemfig{A-\emptydisk-\fulldisk-B}\par

\chemfig{A-#(,0pt)\emptydisk-#(0pt,0pt)\fulldisk-#(0pt)B}