Forest
Libraries
4.1 linguistics
\ProvidesForestLibrary{linguistics}[2017/07/14 v0.1.2]
Defaults:
\forestset{

  linguistics@set@baseline/.style={

    if phantom={for next node=linguistics@set@baseline}{baseline}

  },

  libraries/linguistics/defaults/.style={

    default preamble={
Edges of the children will “meet” under the node:
sn edges,
The root of the tree will be aligned with the text … or, more commonly, the example number. More precisely, we actually align the first (in linear order) non-phantom node. This covers the common case of side-by-side trees joined with a phantom root.
    before drawing tree={

      if nodewalk valid={name=forest@baseline@node}{}{linguistics@set@baseline},

    },
Enable (centered) multi-line nodes.
     for tree={align=center},

    },

  },

}
There’s no linguistics without c-command1 …
c-commanded(step)
Visit all the nodes c-commanded by the current node.
c-commanders(step)
Visit all the c-commanders of the current node, starting from the closest.
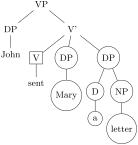
  \begin{forest}

    [VP

      [DP[John]]

      [V'

        [V, draw, for c-commanded={draw,circle}

          [sent]

        ]

        [DP[Mary]]

        [DP[D[a]][NP[letter]]]

      ]

    ]

  \end{forest}
See how branch’ is used to define c-commanded, and how while nodewalk valid and fake are combined in the definition of c-commanders.
\forestset{

  define long step={c-commanded}{style}{branch'={siblings,descendants}},

  define long step={c-commanders}{style}{while nodewalk valid={parent}{siblings,fake=parent}},

}
c-commanders could also be defined using branch:
branch={current and ancestors, siblings}
sn edges
In linguistics, most people want the parent-child edge to go from the south of the parent to the north of the child. This is achieved by this (badly named) style, which makes the entire (sub)tree have such edges.

  \begin{forest}

    sn edges

    [VP

      [DP]

      [V'

        [V]

        [DP]

      ]

    ]

  \end{forest}
\forestset{

  sn edges/.style={

    for tree={

      parent anchor=children, child anchor=parent

    }

  },

}
A note on implementation. Despite its name, this style does not refer to the south and north anchor of the parent and the child node directly. If it did so, it would only work for trees with standard linguistic grow=-90. So we rather use Forest’s growth direction based anchors: children always faces the children and parent always faces the parent, so the edge will always be between them, and the normal, upward growing trees will look good as well.
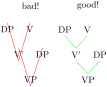
  \begin{forest}

    [bad![VP,no edge, for tree={grow=90, edge=red},

      for tree={parent anchor=south, child anchor=north} % bad

    [DP][V'[V][DP]]]]

  \end{forest}

  \begin{forest}

    [good![VP, no edge, for tree={grow=90, edge=green},

               ~sn edges~                                 % good!

    [DP][V'[V][DP]]]]

  \end{forest}
roof
Makes the edge to parent a triangular roof.
\forestset{

  roof/.style={edge path'={%

      (.parent first)--(!u.children)--(.parent last)--cycle

    }

  },

}
nice empty nodes
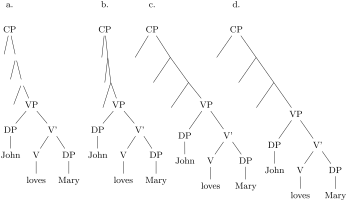
We often need empty nodes: tree (101a) shows how they look like by default: ugly.
First, we don’t want the gaps: we change the shape of empty nodes to coordinate. We get tree (101b).
Second, the empty nodes seem too close to the other (especially empty) nodes (this is a result of a small default s_sep). We could use a greater s sep, but a better solution seems to be to use calign=fixed_angles. The result is shown in (101c).
However, at the transitions from empty to non-empty nodes, tree (101c) seems to zigzag (although the base points of the spine nodes are perfectly in line), and the edge to the empty node left to VP seems too long (it reaches to the level of VP’s base, while we’d prefer it to stop at the same level as the edge to VP itself). The first problem is solved by substituting fixed_angles for fixed_edge_angles; the second one, by anchoring siblings of empty nodes at north. Voilà, (101d)!
  \forestset{

    xlist/.style={

      phantom,

      for children={no edge,replace by={[,append,

          delay={content/.wrap pgfmath arg={\csname @alph\endcsname{##1}.}{n()+#1}}

          ]}}

    },

    xlist/.default=0

  }

  \begin{forest}

    [,~xlist~,

    for tree={after packing node={s+=0.1pt}}, % hack!!!

      [CP,                                                               %(a)

        [][[][[][VP[DP[John]][V'[V[loves]][DP[Mary]]]]]]]

      [CP, delay={where content={}{shape=coordinate}{}}                  %(b)

        [][[][[][VP[DP[John]][V'[V[loves]][DP[Mary]]]]]]]

      [CP, for tree={calign=fixed angles},                               %(c)

           delay={where content={}{shape=coordinate}{}}

        [][[][[][VP[DP[John]][V'[V[loves]][DP[Mary]]]]]]]

      [CP, ~nice empty nodes~                                              %(d)

        [][[][[][VP[DP[John]][V'[V[loves]][DP[Mary]]]]]]]

    ]

  \end{forest}
\forestset{

  nice empty nodes/.style={

    for tree={calign=fixed edge angles},

    delay={where content={}{shape=coordinate,

                            for current and siblings={anchor=north}}{}}

  },

}
draw brackets
Outputs the bracket representation of the tree.
draw brackets compact
draw brackets wide
These keys control whether the brackets have extra spaces around them (wide) or not (compact).
\providecommand\text[1]{\mbox{\scriptsize#1}}

\forestset{

  draw brackets compact/.code={\let\drawbracketsspace\relax},

  draw brackets wide/.code={\let\drawbracketsspace\space},

  draw brackets/.style={
There’s stuff to do both before (output the opening bracket and the content) and after (output the closing bracket) processing the children, so we use for tree’.
    for tree'={

      TeX={[%
Complication: content format must be expanded in advance, to correctly process tabular environments implicitely loaded by align=center, which is the default in this library. (Not that one would want a multiline output in the bracket representation, but it’s better than crashing.)
        \edef\forestdrawbracketscontentformat{\foresteoption{content format}}%

      },

      if n children=0{

        TeX={\drawbracketsspace\forestdrawbracketscontentformat\drawbracketsspace}

      }{

        TeX={\textsubscript{\text{\forestdrawbracketscontentformat}}\drawbracketsspace}

      },

    }{

      TeX={]\drawbracketsspace},

    }

  },

  draw brackets wide

}
4.1.1 GP1
GP1
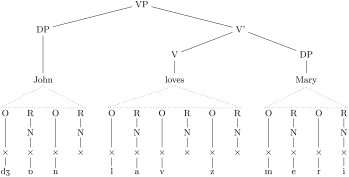
For Government Phonology (v1) representations. Here, the big trick is to evenly space \(\times\)s by having a large enough outer_xsep (adjustable), and then, before drawing (timing control option before_drawing_tree), setting outer_xsep back to 0pt. The last step is important, otherwise the arrows between \(\times\)s won’t draw!
An example of an “embedded” GP1 style:
  \begin{forest}

    myGP1/.style={

      ~GP1~,

      delay={where tier={x}{

          for children={content=\textipa{##1}}}{}},

      tikz={\draw[dotted](.south)--

            (!1.north west)--(!l.north east)--cycle;},

      for children={l+=5mm,no edge}

    }

    [VP[DP[John,tier=word,myGP1

            [O[x[dZ]]]

            [R[N[x[6]]]]

            [O[x[n]]]

            [R[N[x]]]

    ]][V'[V[loves,tier=word,myGP1

             [O[x[l]]]

             [R[N[x[a]]]]

             [O[x[v]]]

             [R[N[x]]]

             [O[x[z]]]

             [R[N[x]]]

    ]][DP[Mary,tier=word,myGP1

           [O[x[m]]]

           [R[N[x[e]]]]

           [O[x[r]]]

           [R[N[x[i]]]]

    ]]]]

  \end{forest}%
And an example of annotations.
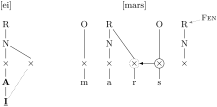
  \begin{forest}[,phantom,s sep=1cm

    [{[ei]}, GP1

      [R[N[x[A,~el~[I,~head~,~associate=N~]]][x]]]

    ]

    [{[mars]}, GP1

      [O[x[m]]]

      [R[N[x[a]]][x,~encircle~,densely dotted[r]]]

      [O[x,~encircle~,~govern=<~[s]]]

      [R,~fen~[N[x]]]

    ]

  ]\end{forest}
\newbox\standardnodestrutbox

\setbox\standardnodestrutbox=\hbox to 0pt{\phantom{\forestOve{standard node}{content}}}

\def\standardnodestrut{\copy\standardnodestrutbox}

\forestset{

  GP1/.style 2 args={

    for n={1}{baseline},

    s sep=0pt, l sep=0pt,

    for descendants={

      l sep=0pt, l={#1},

      anchor=base,calign=first,child anchor=north,

      inner xsep=1pt,inner ysep=2pt,outer sep=0pt,s sep=0pt,

    },

    delay={

      if content={}{phantom}{for children={no edge}},

      for tree={

        if content={O}{tier=OR}{},

        if content={R}{tier=OR}{},

        if content={N}{tier=N}{},

        if content={x}{

          tier=x,content={$\times$},outer xsep={#2},

          for tree={calign=center},

          for descendants={content format={\noexpand\standardnodestrut\forestoption{content}}},

          before drawing tree={outer xsep=0pt,delay={typeset node}},

          s sep=4pt

        }{},

      },

    },

    before drawing tree={where content={}{parent anchor=center,child anchor=center}{}},

  },

  GP1/.default={5ex}{8.0pt},

  associate/.style={%

    tikz+={\draw[densely dotted](!)--(!#1);}},

  spread/.style={

    before drawing tree={tikz+={\draw[dotted](!)--(!#1);}}},

  govern/.style={

    before drawing tree={tikz+={\draw[->](!)--(!#1);}}},

  p-govern/.style={

    before drawing tree={tikz+={\draw[->](.north) to[out=150,in=30] (!#1.north);}}},

  no p-govern/.style={

    before drawing tree={tikz+={\draw[->,loosely dashed](.north) to[out=150,in=30] (!#1.north);}}},

  encircle/.style={before drawing tree={circle,draw,inner sep=0pt}},

  fen/.style={pin={[font=\footnotesize,inner sep=1pt,pin edge=<-]10:\textsc{Fen}}},

  el/.style={content=\textsc{\textbf{##1}}},

  head/.style={content=\textsc{\textbf{\underline{##1}}}}

}
1 The definition of c-command is as follows: a node c-commands its siblings and their descendants.