The nicematrix package
5 The rules
The usual techniques for the rules may be used in the environments of nicematrix (except \vline). However, there is some small differences with the classical environments.
5.1 Some differences with the classical environments
5.1.1 The vertical rules
In the environments of nicematrix, the vertical rules specified by | in the preambles of the environments are never broken, even by an incomplete row or by a double horizontal rule specified by \hline\hline (there is no need to use the package hhline1).

\begin{NiceTabular}{|c|c|} \hline

  First & Second \\ \hline\hline

  Peter \\ \hline

  Mary & George\\ \hline

\end{NiceTabular}
However, the vertical rules are not drawn in the blocks (created by \Block: cf. 4) nor in the corners (created by the key corner: cf. 5.3.3) nor in the potential exterior rows (created by the keys first-row and last-row: cf. 9).
If you use \multicolumn there is no need to add the potential | or || at the end of the little preamble (but, in the environments of nicematrix, it’s often more practicable to use the command \Block).
If you use booktabs (which provides \toprule, \midrule, \bottomrule, etc.) and if you actually want to add vertical rules (which is not in the spirit of booktabs), you should notice that the vertical rules drawn by nicematrix are compatible with booktabs. Remark that nicematrix does not load booktabs.

$\begin{NiceArray}{c|ccc} \toprule

  a & b & c & d \\ \midrule

  1 & 2 & 3 & 4 \\

  1 & 2 & 3 & 4 \\ \bottomrule

\end{NiceArray}$
However, it’s still possible to define a specifier (named, for instance, I) to draw vertical rules with the standard behaviour of array. In this aim, we use the standard command \newcolumntype of array.
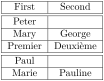
\newcolumntype{I}{!{\vrule}}

\begin{NiceTabular}{IcIcI} \hline

  First & Second \\ \hline\hline

  Peter & \\ \hline

  Mary  & George\\ \hline

Premier & Deuxième \\ \hline\hline

Paul  & \\ \hline

Marie & Pauline \\ \hline

\end{NiceTabular}
Of course, in this case, there is no point using {NiceTabular} and it’s better to use the standard environment {tabular} but maybe we will have to use other functionalities provided by nicematrix. One should also consider the command \FalseRow (cf. 5.3.8) for the tables with horizontal double rules.
5.1.2 The command \cline
The horizontal and vertical rules drawn by \hline and the specifier “|” make the array larger or wider by a quantity equal to the width of the rule (with array and also with nicematrix).
For historical reasons, this is not the case with the command \cline, as shown by the following example.

\setlength{\arrayrulewidth}{2pt}

\begin{tabular}{cccc} \hline

  A&B&C&D \\ \cline{2-2}

  A&B&C&D \\ \hline

\end{tabular}
In the environments of nicematrix, this situation is corrected (it’s still possible to go to the standard behaviour of \cline with the key standard-cline).

\setlength{\arrayrulewidth}{2pt}

\begin{NiceTabular}{cccc} \hline

  A&B&C&D \\ \cline{2}

  A&B&C&D \\ \hline

\end{NiceTabular}
In the environments of nicematrix, an instruction \cline{i} is equivalent to \cline{i-i}.
5.2 The thickness and the color of the rules
The environments of nicematrix provide a key rules/width to set the width (in fact the thickness) of the rules in the current environment. In fact, this key merely sets the value of the standard LaTeX length \arrayrulewidth.
It’s well known that colortbl provides the command \arrayrulecolor in order to specify the color of the rules.
With nicematrix, it’s possible to specify the color of the rules even when colortbl is not loaded. For sake of compatibility, the command is also named \arrayrulecolor. However, nicematrix also provides a key rules/color, available in \NiceMatrixOptions or in an individual environment, to fix the color of the rules. This key sets the value locally (whereas \arrayrulecolor acts globally!) and should be preferred.
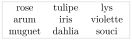
\begin{NiceTabular}{|ccc|}[\emph{rules/color=[gray]{0.9},rules/width=1pt}]

\hline

  rose & tulipe & lys \\

  arum & iris & violette \\

  muguet & dahlia & souci \\

\hline

\end{NiceTabular}
In fact, in that example, instead of \hline, it would have a better choice to use \Hline, provided by nicematrix and described just below, because it ensures a better output in the PDF viewers at the low levels of zoom.
5.3 The tools of nicematrix for the rules
Here are the tools provided by nicematrix for the rules.
the keys hlines, vlines, hvlines and hvlines-except-borders;
the specifier “|” in the preamble (for the environments with preamble);
the command \Hline.
All these tools don’t draw the rules in the blocks nor in the empty corners (when the key corners is used), nor in the exterior rows and columns.
These blocks are:
The corners are created by the key corners explained below (cf. 5.3.3).
For the exterior rows and columns, cf. 9.
In particular, this remark exhibits a first difference between the standard command \hline and the command \Hline provided by nicematrix.
Moreover, the key \Hline takes in an optional argument (between square brackets) which is a list of key=value pairs. For the description of those keys, see custom-line, in the section 5.3.5.3
As well as the command \Hline, the specifier “|” supports an optional argument between square brackets for the characteristics of the rule.

\begin{NiceTabular}{ | c |[color=blue] c |}

\Hline

a & b \\

\Hline[color=red]

c & d \\

\Hline

\end{NiceTabular}
5.3.1 The keys hlines and vlines
The keys hlines and vlines draw horizontal and vertical rules.
If no value is provided, all the rules are drawn.
When a value is provided, it should be a comma-separated list of numbers (corresponding to the rules which will be drawn).
It’s possible to put some intervals of integers with the syntax \(i\)-\(j\)
It’s possible to put negative numbers (which are counted from the end).
In fact, for the environments with delimiters (such as {pNiceMatrix} or {bNiceArray}), the key vlines don’t draw the exterior rules (this is certainly the expected behaviour).

$\begin{pNiceMatrix}[vlines,rules/width=0.2pt]

  1 & 2 & 3 & 4 & 5 & 6 \\

  1 & 2 & 3 & 4 & 5 & 6 \\

  1 & 2 & 3 & 4 & 5 & 6

\end{pNiceMatrix}$
When the key hlines is in force, it’s still possible to use \Hline\Hline to put a double horizontal rule. As well, it’s possible to put || in the preamble (of an environment with preamble) to put a double vertical rule, even when the key vlines is in force.
5.3.2 The keys hvlines, hlines-except-borders and hvlines-except-borders
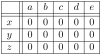
The key hvlines (no value) is the conjunction of the keys hlines and vlines.
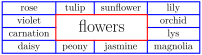
It’s worth noting that, when the key rounded-corners is used for the environment {NiceTabular}, the key hvlines draws rounded corners for the exterior frame of the tabular (cf. 14.2).
The key hlines-except-borders is similar to the key hlines but does not draw the rules on the horizontal borders of the array. The key hvlines-except-borders is similar to the key hvlines but does not draw the rules on the horizontal and vertical borders of the array. For an example of use of that key, see the part “Use with tcolorbox” (18.3).
5.3.3 The (empty) corners
The four corners of an array will be designed by NW, SW, NE and SE (north west, south west, north east and south east).
For each of these corners, we will call empty corner (or simply corner) the reunion of all the empty rectangles starting from the cell actually in the corner of the array.4
However, it’s possible, for a cell without content, to require nicematrix to consider that cell as not empty with the command \NotEmpty.
In the example on the right (where B is in the center of a block of size \(2\times2\)), we have colored in blue the four (empty) corners of the array.
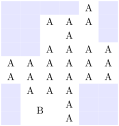
When the key corners5 is used, nicematrix computes the four (empty) corners and these corners will be taken into account by the tools for drawing the rules (the rules won’t be drawn in the corners).
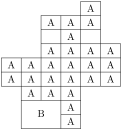
\NiceMatrixOptions{cell-space-top-limit=3pt}

\begin{NiceTabular}{*{6}{c}}[corners,hvlines]

    &   &   &   & A \\

    &   & A & A & A \\

    &   &   & A \\

    &   & A & A & A & A \\

  A & A & A & A & A & A \\

  A & A & A & A & A & A \\

    & A & A & A \\

    & \Block[C]{2-2}{B} & & A \\

    &   &   & A \\

\end{NiceTabular}
It’s also possible to provide to the key corners a (comma-separated) list of corners (designed by NW, SW, NE and SE).
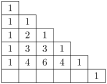
\NiceMatrixOptions{cell-space-top-limit=3pt}

\begin{NiceTabular}{*{6}{c}}[corners=NE,hvlines]

  1\\

  1&1\\

  1&2&1\\

  1&3&3&1\\

  1&4&6&4&1\\

   & & & & &1

\end{NiceTabular}
\(\triangleright\) The corners are also taken into account by the tools provided by nicematrix to color cells, rows and columns. These tools don’t color the cells which are in the corners (cf. 6.2). The command \TikzEveryCell available in the \CodeBefore and the \CodeAfter (cf. 12.4) takes also into account the empty corners.
New 7.10
A generalization of the «corners» has been made with the new values N, S, E and W for the «corners».

5.3.4 The command \diagbox
The command \diagbox (inspired by the package diagbox), allows, when it is used in a cell, to slash that cell diagonally downwards.

It’s possible to use the command \diagbox in a \Block.

But it’s also possible to use \diagbox for the diagonal rule only (and the labels are put but the usual way, that is to say in the cells of the tabular).

Nevertheless, it’s always possible to draw whatever rule we wish with TikZ in the \CodeAfter (or the \CodeBefore) by using the PGF/TikZ nodes created by nicematrix: cf. 15.
5.3.5 Commands for customized rules
It’s also possible to define commands and letters for customized rules with the key custom-line available in \NiceMatrixOptions and in the options of individual environments. That key takes in as argument a list of key=value pairs. First, there is three keys to define the tools which will be used to use that new type of rule.
the key command is the name (with or without the backslash) of a command that will be created by nicematrix and that will be available for the final user in order to draw horizontal rules (similarly to \hline);
the key ccommand is the name (with or without the backslash) of a command that will be created by nicematrix and that will be available for the final user to order to draw partial horizontal rules (similarly to \cline, hence the name ccommand): the argument of that command will be list of intervals of columns specified by the syntax \(i\) or \(i\)-\(j\).6
the key letter takes in as argument a letter7 that the user will use in the preamble of an environment with preamble (such as {NiceTabular} in order to specify a vertical rule.
We will now speak of the keys which describe the rule itself. Those keys may also be used in the (optional) argument of an individual command \Hline or in the (optional) argument of a specifier “|” in the preamble of an environment. They are also used for the key default-line.
There are four possibilities:
the basic rules, which may be drawn by using (for example) colortbl: these are simple or multiple rules, with color and a color between the rules;
the dashed rules (key dashed);
the dotted rules (key dotted);
all the rules which may be draw with TikZ (key tikz).
We will now describe these four kinds of rules.
First possibility
It’s possible to specify composite rules, with a color and a color for the inter-rule space (as possible with colortbl for instance).
the key multiplicity is the number of consecutive rules that will be drawn: for instance, a value of \(2\) will create double rules such those created by \hline\hline or || in the preamble of an environment;
the key color sets the color of the rules ;
the key sep-color sets the color between two successive rules (should be used only in conjunction with multiplicity). The name of that key is inspired by the command \doublerulesepcolor of colortbl.
That system may be used, in particular, for the definition of commands and letters to draw rules with a specific color (and those rules will respect the blocks and corners as do all the rules of nicematrix).
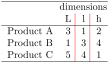
\begin{NiceTabular}{lcIcIc}[custom-line = {letter=I, color=red}]

\Hline

            & \Block{1-3}{dimensions} \\

            & L & l & h \\

\Hline

  Product A & 3 & 1 & 2 \\

  Product B & 1 & 3 & 4 \\

  Product C & 5 & 4 & 1 \\

\Hline

\end{NiceTabular}
The key sep-color with the value white may also be used in case of an horizontal double-rule on the top of a colored cell (unlike the case with {tabular} and colortbl, the color applies by default between the rules).

\NiceMatrixOptions

  {

    custom-line =

     {

       command = \DoubleRule ,

       multiplicity = 2 ,

       sep-color = white

     }

  }


\begin{NiceTabular}{ccc}

  one & two & three \\

\DoubleRule

  four & \cellcolor{yellow} five & six \\

\end{NiceTabular}
However, for double rules in conjunction with colored backgrounds, it’s probably more advisable to use the “false rows” provided by the command \FalseRow (dans the letter F for the false columns): cf. 5.3.8.
Second possibility : the key dashed
The extension nicematrix provides the commands \hdashedline and \cdashedline and the letter «;» for dashed rules. They are available when TikZ is loaded because it’s merely a line of TikZ with the style dash pattern = on 4 pt off 2pt. In fact, when the TikZ library decorations is loaded (with \usetikzlibrary{decorations}), the key dash expand off is added for a better output.
Thus, it’s possible to use the commands \hdashedline and \cdashedline to draw horizontal dashed rules.
\usepackage{tikz}            % in the preamble

\usetikzlibrary{decorations} % in the preamble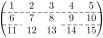
$\begin{pNiceMatrix}

1 & 2 & 3 & 4 & 5 \\

\hdashedline

6 & 7 & 8 & 9 & 10 \\

\cdashedline{1,4-5}

11 & 12 & 13 & 14 & 15

\end{pNiceMatrix}$
In the environments with an explicit preamble (like {NiceTabular}, {NiceArray}, etc.), it’s possible to draw a vertical dashed rule with the specifier “;”.
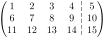
$\begin{pNiceArray}{cccc;c}

1 & 2 & 3 & 4 & 5 \\

6 & 7 & 8 & 9 & 10 \\

11 & 12 & 13 & 14 & 15

\end{pNiceArray}$
If you wish a more important reservation of space for those rules, you should define, with custom-line, some new commands by using the key dashed in conjonction with the key total-width.
\NiceMatrixOptions

  {

    custom-line =

     {

       command = \myhdashedline ,

       ccommand = \mycdashedline ,

       dashed,

       total-width = 10 pt

     }

  }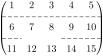
$\begin{pNiceMatrix}

1 & 2 & 3 & 4 & 5 \\

\myhdashedline

6 & 7 & 8 & 9 & 10 \\

\mycdashedline{1,4-5}

11 & 12 & 13 & 14 & 15

\end{pNiceMatrix}$
Third possibility : the key dotted
The extension nicematrix provides the commands \hdottedline and \cdottedline and the letter «:» for dotted lines. For these lines, nicematrix does not use TikZ but an internal system. In fact, it’s the same as the system used by the commands \Cdots, \Vdots, etc. (cf. 10).
Thus, it’s possible to use the commands \hdottedline and \cdottedline to draw horizontal dotted rules.
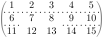
$\begin{pNiceMatrix}

1 & 2 & 3 & 4 & 5 \\

\hdottedline

6 & 7 & 8 & 9 & 10 \\

\cdottedline{1,4-5}

11 & 12 & 13 & 14 & 15

\end{pNiceMatrix}$
In the environments with an explicit preamble (like {NiceTabular}, {NiceArray}, etc.), it’s possible to draw a vertical dotted rule with the specifier “:”.
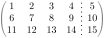
$\begin{pNiceArray}{cccc:c}

1 & 2 & 3 & 4 & 5 \\

6 & 7 & 8 & 9 & 10 \\

11 & 12 & 13 & 14 & 15

\end{pNiceArray}$
Like with the key dashed described previously, it’s possible to use this key in conjunction with the key total-width.
Fourth possibility : the key tikz
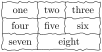
It’s possible to use the key tikz (if TikZ is loaded). In that case, the rule is drawn directly with TikZ by using as parameters the value of the key tikz which must be a list of key=value pairs which may be applied to a TikZ path.
By default, no space is reserved for the rule that will be drawn with TikZ. It is possible to specify a reservation (horizontal for a vertical rule and vertical for an horizontal one) with the key total-width. That value of that key, is, in some ways, the width of the rule that will be drawn (nicematrix does not compute that width from the characteristics of the rule specified in tikz).
\usepackage{tikz}                         % in the preamble

\usetikzlibrary{decorations.pathmorphing} % in the preamble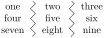
\NiceMatrixOptions

  {

    custom-line =

     {

       letter = I ,

       tikz = { decorate, decoration = zigzag } ,

       total-width = 6 pt

     }

  }


\begin{NiceTabular}{cIcIc}

  one & two & three \\

  four & five & six \\

  seven & eight & nine

\end{NiceTabular}
As we have said, the previous keys may be used in the optional argument of an individual command \Hline and in the optional argument of a specifier “|” in the preamble of an environment (for instance {NiceTabular}).
However, in that case, it’s also possible to use two other keys, start and end, which specify the extremities of the rule.
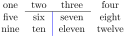
\begin{NiceTabular}{cc|[color=blue,start=2]ccc}

  one & two & three & four

\Hline[start=2,end=3]

  five & six & seven & eight \\

  nine & ten & eleven & twelve

\end{NiceTabular}
5.3.6 The key fix-vertex
New 7.9
Assume that we have defined a command \RandomLine for a line which zigzags randomly:
\usepackage{tikz}                         % in the preamble

\usetikzlibrary{decorations.pathmorphing} % in the preamble
\NiceMatrixOptions

  {

    custom-line =

     {

       command = \RandomLine ,

       tikz =

         {

           decorate ,

           decoration = { random steps, segment length = 5pt, amplitude = 3pt }

         }

     }

  }
Let’s consider the following tabular, with \RandomLine used at the end:
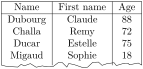
\begin{NiceTabular}{ccc}[vlines]

\Hline

  Name & First name & Age \\

\Hline

  Dubourg & Claude & 88 \\

  Challa & Remy & 72 \\

  Ducar & Estelle & 75 \\

  Migaud & Sophie & 18 \\[1mm]

\RandomLine

\end{NiceTabular}
The internal vertical rules won’t always stop exactly at the bottom line since that line goes randomly from the bottom left corner to the bottom right one.
In order to address this problem, nicematrix provides the key rules/fix-vertex. When that key is in force, the rules are divided in segments between the vertices and those segments are drawn independently of each other.
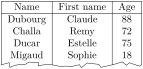
\begin{NiceTabular}{ccc}[vlines,rules/fix-vertex]

\Hline

  Name & First name & Age \\

\Hline

  Dubourg & Claude & 88 \\

  Challa & Remy & 72 \\

  Ducar & Estelle & 75 \\

  Migaud & Sophie & 18 \\[1mm]

\RandomLine

\end{NiceTabular}
5.3.7 The key default-line
New 7.9
The package nicematrix provides the key default-line which sets the style of all the rules that will be drawn by the command \Hline, the specifier | in the preambles of the environments and the keys hvlines, vlines, hlines, etc. The different ways for the specification of the rules are the sames as those for the key custom-line (cf. 5.3.5).
\usepackage{tikz}                         % in the preamble

\usetikzlibrary{decorations.pathmorphing} % in the preamble
\NiceMatrixOptions

  {

    default-line =

      {

        tikz =

          {

            decorate ,

            decoration = { random steps, segment length = 3pt, amplitude = 1pt }

          }

      }

  }
5.3.8 The command \FalseRow and the letter F
New 7.11
For double rules perfectly compatible with the colored backgrounds, nicematrix provides a command \FalseRow and a letter F.
The command \FalseRow must be used after a command \\ of end of row. It creates a new empty row with a height equal to width-of-false\(^+\) (the initial value of that parameter is 2 pt, which is the initial value of \doublerulesep). The rules and the colored backgrounds won’t be drawn in that row.
The letter F is available in the environments with preambles ({NiceTabular}, {NiceArray}, etc.). It creates a column with a width equal to the parameter width-of-false. The rules and the colored backgrounds won’t bex drawn in that column. Caution: that column is a actual column of the tabular and two ampersands (&&) must be used in the rows that cross that column.

\begin{NiceTabular}{cFcc}[hvlines]

\CodeBefore

  \rowcolor[opacity=0.5]{red!50}{3}

  \columncolor[opacity=0.5]{blue!50}{3}

\Body

\diagbox{x}{y} && a & b \\

\FalseRow

a              && b & a \\

b              && a & b

\end{NiceTabular}
New 7.12
A key color-of-false is provided for the color of the backgrounds of those false rows and false columns.
1 But hhline may be used with nicematrix: see the example 18.6.
2 And also the command \multicolumn but it’s recommended to use instead \Block in the environments of nicematrix (by the way, the command \multicolumn has the feature, unlike \Block, that it enlarges the last column if necessary).
3 Technical remark: If the user wants to write a command over the command \Hline, it shall be ensured that this new command is expandable in the TeX sens (by using, for instance, \NewExpandableDocumentCommand of LaTeX3, \newcommand of LaTeX or \def of TeX). Example: \NewExpandableDocumentCommand}{}{\Hline[color=red]}
4 For sake of completeness, we should also say that a cell contained in a block (even an empty cell) is not taken into account for the determination of the corners. That behaviour is natural. The precise definition of a “non-empty cell” is given below (cf. 17.2).
5 The key corners that we describe now has no direct link with the key rounded-corners described in the part 14.2.
6 It’s recommended to use such commands only once in a row because each use will create space between the rows corresponding to the total width of the rule. Likewise, it’s possible to draw several rules with only one use of the command.
7 The following letters are forbidden: lcrpmbFVX|()[]!@<>